baby proofed parents

where sane meets baby brain

Subscribe To The BPP Postcard

  • Home
  • About
    • ABOUT KIRSTEN
    • WRITING & MEDIA
    • WORKSHOPS
    • PROFESSIONAL COUNSELING SERVICES
  • PREGNANCY
  • Parenting
  • RELATIONSHIPS
  • WELLNESS
    • ANXIETY
    • DEPRESSION
    • SELF CARE
  • CONTACT
    • WORKSHOPS
    • PROFESSIONAL COUNSELING SERVICES

Roasted Cauliflower :: Friday Foodie

November 7, 2014 By: babyproofedparentscomment

roasted_cauliflower-600x300

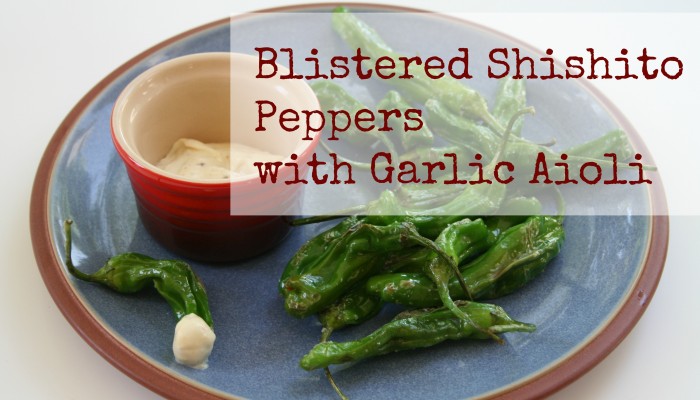
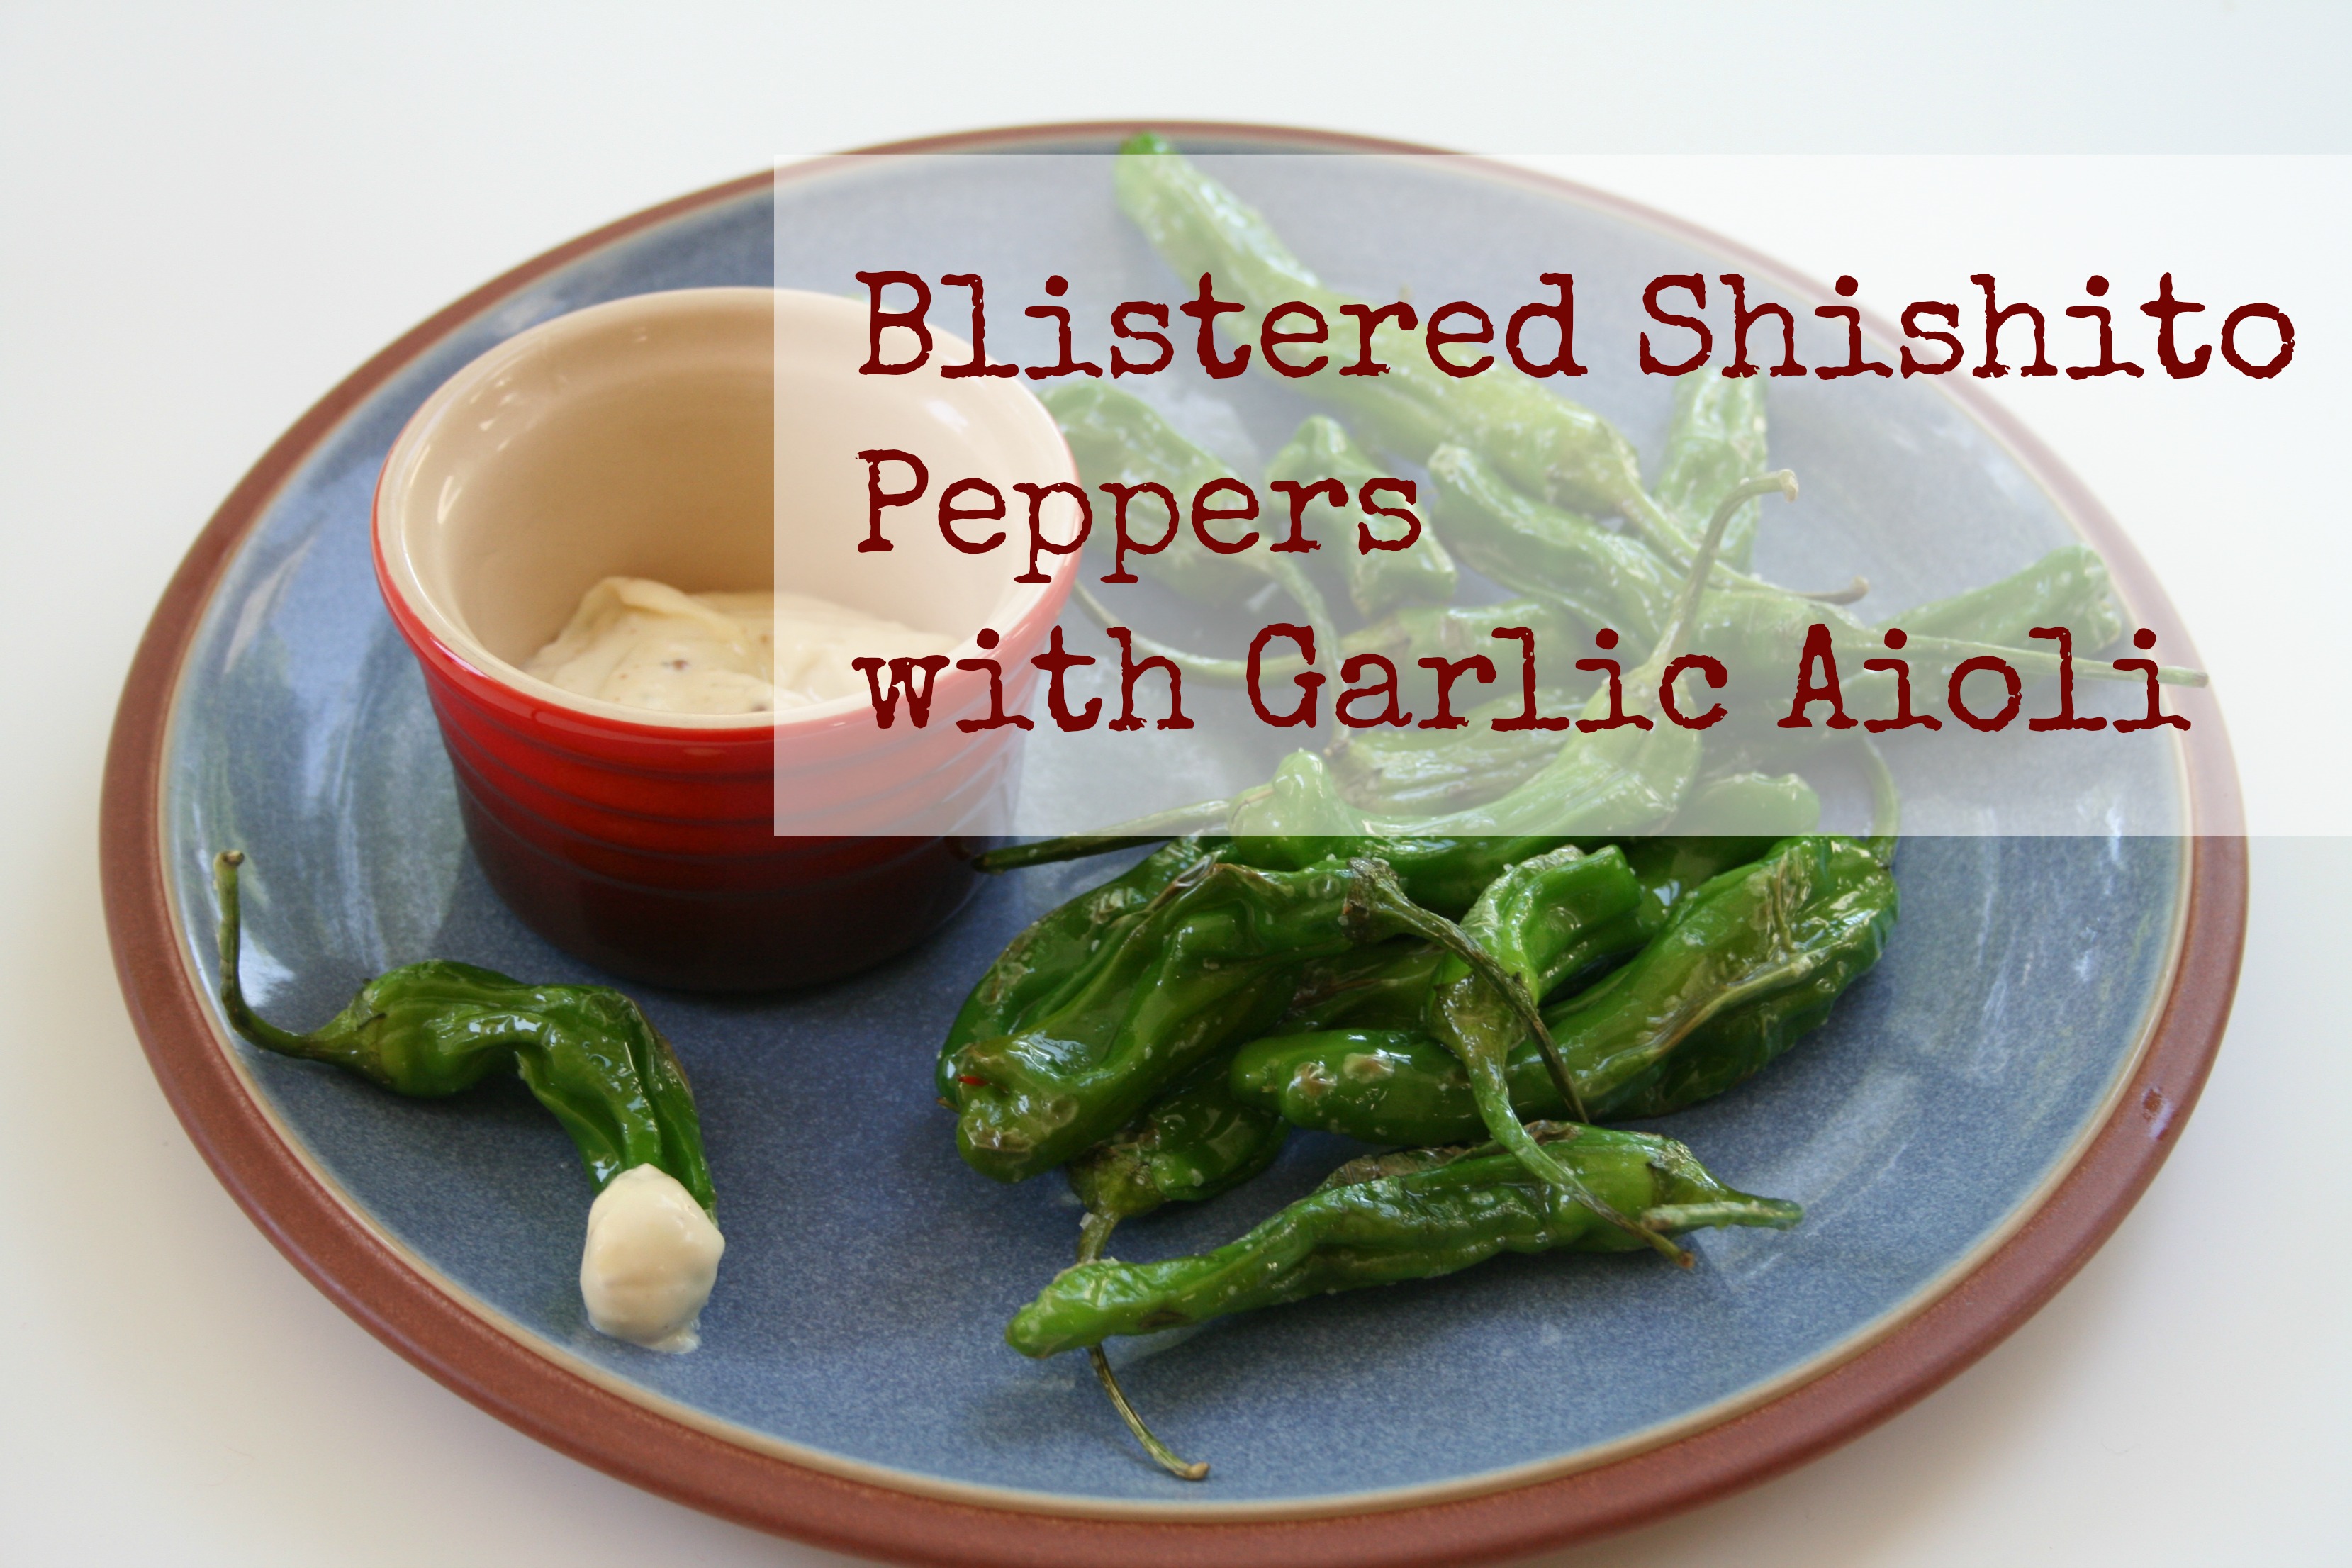
My early relationship with cauliflower was bleh.  I’d only eaten it raw, on a veggie tray with a big bowl of ranch dip.  The last lonely choice, after the carrots and celery were long gone, texture grainy, flavor odd.  The awkward, pale white girl alone in the corner of the dance hall.  Oops, we’re talking food, not my prom.  Fast forward years later to a night at my favorite Austin sushi joint, Uchi.  The wait is often insane, and always very well worth every second.  To appease hungry guests, Uchi serves little tastes from the kitchen.  A tray of simple golden-roasted, salty, olive-oily cauliflower came by, and I reluctantly popped a piece into my mouth.  Oh, wow.  Cauliflower?!  Sexy!  Who knew?  When roasted, the texture is silky, the flavor buttery and nutty.  I immediately worked to replicate the dish in my own kitchen, and think you’ll like the results.  I’ve served it to my kids, had them close their eyes and imagine popcorn, and they both ate one bite without gagging or spitting it out.  Victory!

Ingredients:

  • 1 bunch cauliflower
  • 2 tablespoons olive oil
  • 1 teaspoon kosher salt

Technique:

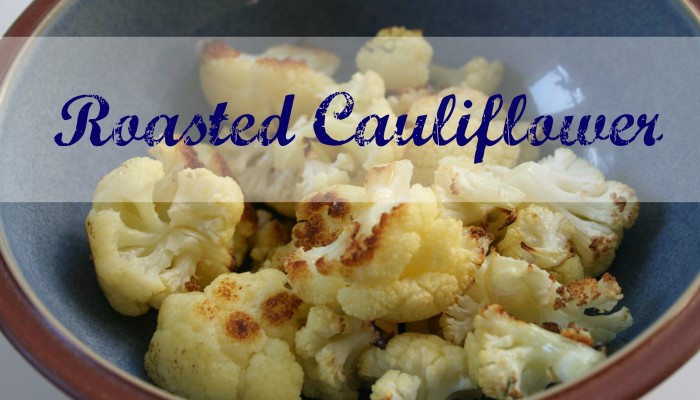
Preheat your oven to 450 degrees.  Using a small knife, remove the outer green leaves of the cauliflower bunch, and cut the white florets off of the stem.  Wash the florets, and drain/pat them dry with a clean dish towel.  Line a large rimmed baking sheet with aluminum foil, and spread the florets in a single layer over it.  Drizzle the florets with the olive oil, and roast them in the oven for 25 minutes.  The cauliflower will be covered with golden brown spots when it’s perfect.  Remove from the oven, and sprinkle the salt over the florets, scooping them around on the pan with a spatula to evenly coat them with the salt and olive oil.  Dig in!

Cheryl’s Tips:

I recommend doubling this recipe.  The leftovers reheat beautifully, and can be used again in a delightful pasta recipe.  Yeah.  That’s a teaser.  The delightful pasta recipe will be coming to you soon, on this very blog.  You just take a nice, deep breath… and wait for it.

Here’s to Sanity and Sushi,

Cheryl

5_MG_0872

Blistered Shishito Peppers with Garlic Aioli :: Friday Foodie

May 9, 2014 By: babyproofedparentscomment

peppers

Before we begin, try saying their perfect name out loud: shi-SHEE-toes.  Isn’t that lovely?  A farmer at my favorite market recommended these perfect peppers, and I’ve been hooked ever since.  I’ve noticed several posh restaurants have added shishitos to their appetizer menus with a steep price tag.  Preparing them yourself is cheaper and way impressive as an appetizer or a side veggie (divide the aioli into tiny dipping bowls and serve a few peppers on each plate).  Risk Disclaimer:  most shishitos are mild with a tiny hint of sweet, but occasionally you’ll come across one that packs a little heat.  If your child is sensitive to spicy foods, sample each pepper before serving it to them, unless they’re like my pepper-belly son.  Given food with heat, he’ll accusatorially say, “Mom! Spicy!” while continuing to shovel in huge mouthfuls.  We have to monitor our margarita intake at Mexican restaurants so we can keep a close eye on him; once he slipped a drinking straw into the salsa bowl and guzzled it.  I think it’s genetic, as I am spicy food girl and have blown out my taste buds’ heat detection abilities.  If the menu has a million asterisks denoting the spiciness of a dish,  “Warning!  You probably shouldn’t order this!” then that’s what I’ll be having.  But don’t fear the shishito, and get ready to fall in love with the aioli.

Ingredients:

For the Aioli:

  • 1/2 cup mayonnaise
  • 1 clove garlic, finely minced
  • 1/2 teaspoon fresh lemon juice
  • 1/4 teaspoon Spike seasoning (optional, but delicious flavor without a bunch of gunk you can’t pronounce)
  • (If you don’t use Spike, add 1/8 teaspoon each of kosher salt and cayenne pepper)
  • 1/2 teaspoon Dijon mustard

For the Peppers:

  • 4 cups shishito peppers, washed with stems left on
  • 2 tablespoons macadamia nut, peanut or grape seed oil
  • 1 teaspoon coarse kosher salt

Technique:

For the Aioli:
Combine all the ingredients with a small whisk, and place in a small bowl for dipping.  I love it when things are this easy.

For the Peppers:
Heat a large skillet over medium-high, then add the oil.  When it’s shimmering, carefully add the shishitos, which will go crazy at first, making the hot oil pop.  Once they calm down, begin to stir-fry them with a wooden spoon, until you can see the skin start to whiten and then lightly brown in spots, about 7-10 minutes.  Add a tablespoon of water and turn the heat down to medium (this will steam and soften them to the perfect texture).  Continue stir-frying until the water completely evaporates, and the shishitos are slightly more pliable (about 3-5 minutes more).  Add the salt, stir a few more times to coat the peppers, then serve them on a platter next to your cute little bowl of aioli.  Allow to cool for a few minutes and then dive in, dipping each pepper and challenging yourself to eat them all the way to the stem in one perfect bite.

Cheryl’s Tips:

I recommend using a garlic press.  They’re quick, easy to clean, and make the flavor of the garlic even more potent.  When you’re using raw garlic in a dip or salsa, cut the cloves in half lengh-wise, and check for any little green shoots in the center (which can make your dishes taste bitter) before chopping or putting them through your press.  Use a small knife to dig out the shoots and compost them, or plant them to grow more!  I always use fresh garlic instead of the pre-minced jarred kind – I can’t imagine mass-producers carefully removing little green shoots.

The aioli.  Yum.  If you haven’t already eaten the leftovers with a spoon, it will keep refrigerated for up to two weeks.  It’s divine on sandwiches, eggs, roasted chicken, as a dip for raw veggies, or my favorite use:  atop pan-seared salmon.  I often double the recipe, keeping it on hand as a condiment.

Shishito it up, ya’ll.

Here’s to Sanity and Pepper-Bellies,

Cheryl

5_MG_0872

Braised Collard Greens with Olive Oil Breadcrumbs :: Friday Foodie

March 13, 2014 By: babyproofedparentscomment

braisedcollards

Okay.  I’ll be straight with you… my kids become mildly offended when I serve greens to them, rendering this recipe slightly less than family “friendly”.  But, as you’re gathering, BPP is all about self-care, which carries over to how your kids see you taking care of your own body, and the resulting impression on them. There are lots of suggestions out there on getting veggies into your child’s diet. My two approaches are to purée and hide them (more on that in the Cheryl’s Tips section below), or to give them a healthy serving, and when they protest, announce, “Mister Collard just wants to sit on your plate.” (Aside: why do I always refer to veggies in the masculine? I’ll have to analyze that.) Bottom line, these buttery-textured greens are delicious and incredibly good for you.

Ingredients:

For the Breadcrumbs:

  • 2 slices thick bread (gluten-free if you’re into it), coarsely crumbled
  • 2 tablespoons olive oil
  • 1/4 teaspoon kosher salt
  • 1/8 teaspoon freshly ground pepper

For the Greens:

  • 4 bunches collard greens, washed and sliced across the width in 1 inch strips, discarding the thick bottom stems (this will seem like a ton when you’re buying them, but trust me, they reduce dramatically when they cook, and you will want left-overs!)
  • 1 cup chicken or veggie stock
  • 2 heaping tablespoons coconut oil
  • 1 tablespoon kosher salt (I like my food highly seasoned, use less salt if you are sensitive to it)

Technique:

The Breadcrumbs:  Preheat your oven to 350 degrees.  In a small bowl, stir the breadcrumbs with the olive oil, salt and pepper, and spread on a small baking sheet.  Toast in the oven for about 10 minutes or until golden brown and crunchy.

The Greens:  Place the greens in a in a large dutch oven (you might have to stuff them down).  Pour in the stock and add the salt and coconut oil (don’t worry if it’s still in a solid form – it will melt fast).  Don’t bother stirring yet – too much going on in that pot.  Cover with a heavy lid, and place over medium high heat.  Check every couple of minutes until the liquid starts to boil. Using tongs, carefully stir the greens together until they are all coated with the liquid and have started to reduce in mass.  Replace the lid, and allow the greens to cook at a boil for about 5 minutes.  Reduce the heat to low, and let them simmer an additional 10 minutes (less time if you like your veggies on the firmer side, more time if you like softer.  I used the cooking time for my preference, slightly firm in texture, but a little soft without being squishy or slimy).  The greens will have gone from a bright shamrock to a slightly darker camo green.  Turn off the heat and remove the lid to stop the steaming.  Top each serving with a couple of tablespoons of breadcrumbs and enjoy!

Cheryl’s Tips:

This technique works well with a variety of greens: kale, mustard, Swiss chard, etc.  Simply adjust the cooking time to make sure the resulting texture is to your liking. Collards are my favorite, because they aren’t bitter, and their rich texture is heavenly.  Make the greens a complete meal by topping a bowl of them with tofu, a fried egg, or a few Mandy’s Meatballs.

I love my mini chopper. It’s the perfect, easy-to-clean size for puréeing small servings of veggies to stir into an already kid-approved pasta sauce or meatball recipe.  I usually mix about 1/2 cup of the puréed greens into 2 cups of pasta sauce, then toss with 4 cups of cooked pasta.  If you have extra purée, you can freeze it in ice cube trays for future use.  If you’re interested in making your own baby food, check out Super Baby Food – full of easy recipes for your little ones, plus a handy chart outlining what foods are safe to try at what ages.

Here’s to Greens and Sanity,

Cheryl

5_MG_0872

Connect with BPP

Search The BPP Blog

Online resource for new and expectant parents

Welcome to BPP, an online resource for maintaining your sanity – before, during and after your baby's arrival. I'm Kirsten Brunner and I'm here to support YOU. Read more...

Parenting tips and advice
I'm Published by Mamalode!
TODAY.com Parenting Team Parenting Contributor

Tags

anger anxiety baby birth partner breakfast childbirth co-parenting communication conflict coparenting couple's communication crying dad depression dinner divorce doula easy recipe foodie friends gluten-free healthy hospital kid-friendly labor & delivery laughter love marital marriage newborn parenting postpartum pregnancy prenatal relationship sanity self care sides single parent strength stress stress mgt tantrums tip veggies

Learn About Our Professional Counseling Services

Learn About Our Professional Counseling Services

Pre-Order My Book

Pre-Order My Book

Our Partners

Our Partners

Recognition

Recognition
The Land of Nod, design for kids and people that used to be kids
Tiny Prints - Holiday Offer

For Parents of Multiples

How Do You Do It?

Monthly Archive

The Land of Nod, design for kids and people that used to be kids

Copyright © 2025 · Modern Blogger Pro Theme By, Pretty Darn Cute Design