baby proofed parents

where sane meets baby brain

Subscribe To The BPP Postcard

  • Home
  • About
    • ABOUT KIRSTEN
    • WRITING & MEDIA
    • WORKSHOPS
    • PROFESSIONAL COUNSELING SERVICES
  • PREGNANCY
  • Parenting
  • RELATIONSHIPS
  • WELLNESS
    • ANXIETY
    • DEPRESSION
    • SELF CARE
  • CONTACT
    • WORKSHOPS
    • PROFESSIONAL COUNSELING SERVICES

Epic Protein Smoothie :: Friday Foodie

January 17, 2015 By: babyproofedparentscomment

This tasty recipe comes straight from one of our favorite online vendors, Abe’s Market.  Abe’s is one of those fantastic finds that is ideal for busy parents. If you can’t get out of the house with your newborn or if you don’t have a Sprout’s, Whole Foods or Central Market in your neighborhood, Abe’s Market is the online store for you. They carry all of the gluten-free, organic, coconut-filled, a la naturale goodies and baby-products that you could ever want. We think they’re pretty awesome. We’re happy to say that this isn’t a sponsored post – we just wanted to share this great resource and their yummy smoothie recipe with you. Enjoy!

EpicProteinSmoothie_Social

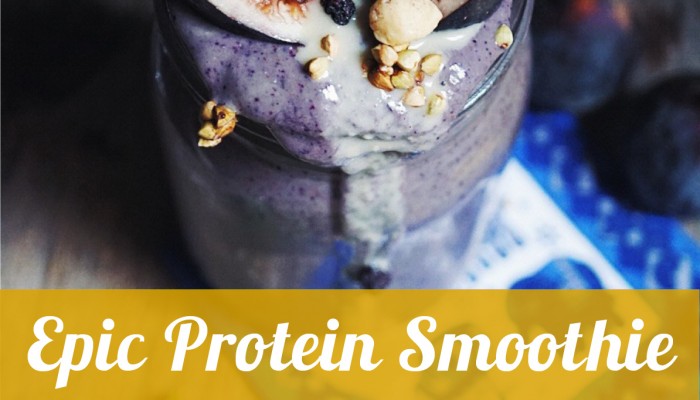
Blueberry, Kale and Fig Protein Smoothie

Ingredients:

  • 2 handfuls of kale, fresh or frozen
  • 1/2 C of figs
  • 1/2 C of frozen blueberries
  • 1 frozen banana
  • 1.5 C coconut or almond milk
  • 1 Tbs hemp seeds
  • 1 Tbs tahini
  • 1 tsp cinnamon
  • 1 scoop protein powder

Instructions:

Place all ingredients in a blender and blend smooth. Feed to your kiddos and get excited that you are depositing healthy servings of veggies, fruits, fat and protein in their little bellies, all in one slurp.  ♥ C & K

Pumpkin French Toast :: Friday Foodie

September 26, 2014 By: babyproofedparentscomment

pumpkin french toast 2

Kirsten taught me this twist on a breakfast classic.  I love that it provides a healthy balance of protein, veggie-based carbs and fat.  Since it doesn’t require pre-soaking the bread or a long baking time, it’s not uncommon for me to quickly throw this together for dinner when I’m in a pinch, with zero complaints from the table.

Ingredients:

  • 8 slices thick-sliced, farm-style bread (the staler the better, use gluten free if you want to be extra healthy)
  • 1 large egg
  • 1/2 cup canned pumpkin
  • 1 t vanilla extract
  • 1/4 teaspoon cinnamon
  • 3/4 cup milk or alternative (my favorite is coconut milk)
  • 2 Tablespoons coconut oil for frying (butter or canola oil can also be used)
  • Maple syrup, honey or agave nectar for dipping (optional)

Technique: 

Heat skillet or griddle over medium.  Slice bread however you like (my kids like strips for dipping efficiency).  Whisk egg, pumpkin, vanilla and cinnamon in a shallow bowl until smooth and well blended, then gradually whisk in milk.  Melt coconut oil in skillet until shimmering.  Dip bread into pumpkin mixture and carefully add to skillet.  Cook about 1-2 minutes on both sides or until golden brown.  Serve, eat and swoon.

Cheryl

5_MG_0872


Gluten-Free Cinnamon-Sugar Muffins :: Friday Foodie

August 15, 2014 By: babyproofedparentscomment

GF Cinnamon Sugar MuffinThese fluffy muffins are vaguely reminiscent of the frozen cinnamon sugar donuts my mom occasionally baked and served up for breakfast.  The same company made “honey buns,” and when those hit the table, it was ON.  They probably contained glue, but hey, who’s keeping track?  When these gf delights are on the menu, we have a “one muffin at a time” rule, because like most humans, my littles like to eat the sweet caramelized tops, leaving the sad bottoms to crumble into oblivion.

Ingredients:

For the Muffins:
1 1/4 cups Pamela’s Pancake and Baking Mix
1/4 cup plain yogurt or kefir
1/4 cup milk or milk alternative
1 egg
1/3 cup honey
1 teaspoon pure vanilla extract
1/4 teaspoon ground nutmeg
1/2 teaspoon ground cinnamon
1/4 cup finely grated zucchini (optional)

For the Topping:
1/4 cup sugar
1 teaspoon ground cinnamon
2 tablespoons butter, melted

Technique:
Lightly grease a 6 cup muffin pan, and preheat your oven to 350 degrees.  In a medium mixing bowl, gently stir all of the muffin ingredients together just until blended (see our GF Orange Glazed Muffin recipe for the emotional ramifications of over-mixing).  Scoop the batter into the muffin pan, dividing it evenly between the six cups.  Bake the muffins for 18-20 minutes, until they’re lightly golden.  Remove them to a rack to cool slightly.  Meanwhile, mix the cinnamon and sugar in a small bowl until well blended.  Gently remove the still very warm muffins from the pan, and roll the muffin tops first in the melted butter, and then in the cinnamon sugar mixture.  I said “muffin tops”.

Cheryl’s Tips:

No tips on this recipe – it’s a cinch, and if they’re old enough, you can even enlist your kids’ help in rolling the warm muffins in the butter/cinnamon-sugar mixture.

You’re smart and pretty.  And don’t you forget it.

Here’s to Sanity and Muffin Tops,

Cheryl

5_MG_0872

Paleo Crepes with Berries :: Friday Foodie

July 4, 2014 By: babyproofedparentscomment

Paleo Crepes with berries

I wish I was a crepe flipper.  Someday, I will conquer my Flip Fear and master this dramatic and sexy cooking technique.  But first, I have to break through my emotional barriers, which are two-fold.  One barrier is triggered by the sensitivity of crepes.  Notice the repeated use of words like “gently” and “carefully” in this recipe.  Crepes tear easily, which can unfairly place them in a “victim” role, and me in an overly-protective “savior” role, thus keeping them from their golden, air-born potential.  The second barrier is triggered by the part of me fundamentally opposed to wasting food.  I hold the pan, ready to go for it, and then think, “What if I flip and miss?  Crepe on the floor, or scorched by the range…lost.  What if I start crying and can’t stop?”  I’ll stick with the spatula.

Ingredients:

  • 6 bananas
  • 4 tablespoons protein powder (I use vanilla whey)
  • 4 eggs
  • 4 tablespoons butter
  • 1 tablespoon toasted coconut
  • 1 tablespoon toasted chopped pecans
  • 1/2 cup fresh blueberries
  • 1 recipe stewed cherries

Technique:
Check out our GF Orange Glazed Muffins with Stewed Cherries recipe for a quick and easy cherry sauce.  It will take you about 10 minutes to throw together before you proceed with the crepes.  See you back here in a few?

In a medium mixing bowl, mash 4 of the bananas.  Add the eggs and the protein powder, and whisk until well blended.  In a non-stick skillet (see suggestions in my tips below) over medium heat, melt 1/2 tablespoon of the butter.  Spoon in enough crepe batter to make a thin, circular layer about 8 inches in diameter.  Sprinkle about 1/2 teaspoon each of the coconut and pecans over the cooking crepe.  After about 2 minutes, you should see a little browning around the edges.  Gently slide a spatula under the center of the crepe, and very carefully flip it over.  Or, if you’re feeling emotionally stable, try air flipping!  Let the crepe cook for another minute, then slide it onto a serving plate.  Repeat this process until you’ve used all the batter, yielding about 8 crepes.  Thinly slice the remaining 2 bananas, and fill the center of each crepe with about 6 slices.  Fold the edges of the crepes over the bananas, and top with 1/4 cup of stewed cherries and a few blueberries.  That is pretty.  Eat it.

Cheryl’s Tips:
Blog recommendation:  these crepes were inspired by Paleo Goddess Juli Bauer’s lovely Protein Pancake recipe.  Juli’s site is packed with deliciousness – an excellent go-to resource for all things Paleo.

I like Tim Ferriss like Tim Ferriss likes Angelina Jolie.  His awesome book The 4 Hour Chef is full of recipes and techniques based on his extensive research with accomplished chefs, and his own experimentation.  His “Top Gear” section lists tested kitchen gadgets to greatly enhance your cooking life.  I have two sizes of the Bialetti Aeternum non-stick skillet he recommends – I love how well they work, and that they are infinitely easier on the environment than most non-stick ware.

Try these crepes for a fancy dessert – filled with vanilla coconut milk ice-cream and topped with either the cherry sauce or melted chocolate.  Yum.

Here’s To Sanity and Flipping,

Cheryl

5_MG_0872

GF Orange Glazed Muffins :: Friday Foodie

June 6, 2014 By: babyproofedparentscomment

Orange_Muffin

There was no “Home Ec” in my high school.  There was, however, “Food Science and Nutrition,” or “FSN” to those in the biz.  We were sooo progressive.  In FSN, I learned all about the complex sensitivity of muffin batter.  If you over-mix it, the muffins can come out full of funky air tunnels.  While some people love to play “6 Degrees of Separation,” I prefer “Turn Everything Into a Mental & Emotional Health Promotional Opportunity.”  Let’s liken over-mixing the muffin batter to overanalyzing/doubting oneself when on the verge of making a major life change, such as embarking on a new career path.  If you question yourself too much, you can stay stuck, infusing your life with tunnels of stagnant air instead of consistently fluffy, magical deliciousness.  Bam!!

Make these easy, orange-tastic muffins with some scrambled eggs tomorrow morning, and watch your day unfold perfectly from there.

Ingredients:

For the Cherries:

  • 1 cup dried, sweetened sour cherries
  • 1/2 cup water

For the Glaze:

  • 2 tablespoons frozen organic orange juice concentrate
  • Up to 1 cup powdered sugar, sifted

For the Muffins:

  • 1 1/4 cups Pamela’s Pancake and Baking Mix
  • 1 egg
  • 1/4 cup plain yogurt or kefir
  • 1/4 cup milk or milk alternative
  • 1/2 cup honey or agave nectar
  • zest of one orange (another opportunity to use your awesome zester – hooray!)
  • 1 teaspoon pure vanilla extract
  • 1/4 cup finely grated zucchini (optional)

Technique

For the Cherries:
In a small saucepan, combine the cherries and water.  Bring to a boil over medium-high heat, stirring occasionally.  Reduce the heat to low and simmer until the cherries have softened and absorbed all but about 1/4th of the water.  Turn off the heat and allow to cool slightly. While cooling, the cherries will absorb a little more water, resulting in a yummy compote to spread over the muffins.

For the Glaze:
Start by whisking the frozen concentrate with 3 tablespoons of the powdered sugar.  The concentrate will melt quickly, and when the mixture is smooth, gradually whisk in the rest of the sugar until it’s slightly thicker.  These measurements make my favorite glaze consistency – it coats the muffins and drizzles onto the plate for dipping every bite.

For the Muffins:
Preheat your oven to 350 degrees.  Combine all the ingredients with a wooden spoon in a medium mixing bowl.  Gently stir until everything is incorporated and no streaks of baking mix or egg show up in the batter, but remember to avoid over-mixing it.  Scoop the batter into a well-greased 6-cup muffin pan, filling each cup to slightly below level.  Bake for 20 minutes or until very lightly browned.  Cool the muffins on a baking rack for about 5 minutes before carefully removing them from the pan, as gluten-free goodies have a tendency to stick.  Drizzle about a tablespoon of glaze over each warm muffin, serve with a small scoop of your lovely cherries, and enjoy!

Cheryl’s Tips:

If you’ve been following our recipes, thank you, and you might wonder why zucchini is in almost everything?  First, it grows like crazy here in Austin, so I try to find creative uses for it.  Second, it is incredibly easy to hide in baked goods and pasta sauces, adds a tiny bit of veggie goodness, and helps me feel less anxious about my children’s ongoing refusal to eat anything green.

I tried making the glaze with the juice of the orange, which seemed more practical, and in theory, tastier.  It fell flat.  The concentrate has such a powerful orange flavor, which is necessary to adequately compliment the milder flavor of the muffin itself.

Those cherries.  Mmmm.  Another decadent use: over frozen vanilla yogurt or a warm brownie.  The same stewing technique works well with other dried fruit, like apricots or plums.  I’ll save the Mental & Emotional Health/Stewing Promo for another time.

Here’s To Sanity and FSN,

Cheryl

5_MG_0872

Gluten-Free Lemon Pancakes w/ Honey Butter :: Friday Foodie

April 10, 2014 By: babyproofedparentscomment

lemonjacks

Show me a therapist with a happy, idyllic childhood, and I’ll show you a unicorn.  Growing up had some pretty rough spots for me, but a bright one was the annual Kiwanis Pancake Supper (isn’t the word “supper” awesome?).  All you could eat stacks of round perfection, with slabs of fried ham on the side.  Balanced nutrition, and a big room full of, at least momentarily, jolly people. So it is with fondness that I present the first of many pancake recipes to come.  Now that I think about it… my 40th birthday is approaching. There will be many, many events commemorating this milestone, and you are witness to the birth of my first solid plan:  Cheryl’s 40th Birthday Pancake Supper.  It is ON.  Okay I’m back.  These light, fluffy, lemony pancakes will delight you.  Go get some lemons and make them right now.

Ingredients

For the Honey Butter:

  • 2 tablespoons softened sweet cream butter
  • 1/4 cup honey

For the Pancakes:

  • 2 cups Pamela’s Baking & Pancake Mix
  • 4 tablespoons coconut oil, melted (more for cooking the pancakes)
  • 2 eggs
  • 2 teaspoons vanilla extract
  • 1/2 cup kefir or plain yogurt
  • 1 1/2 cups milk or milk alternative (my favorite is almond milk)
  • zest and juice of two lemons

Technique

For the Honey Butter:
Using a fork or small whisk, mix the honey and butter together until you reach a thick, spreadable consistency.  It will be lumpy at first, but keep working with it until the butter melts into the honey evenly.  If needed, pop the mixture into the fridge for a few minutes to thicken it further before serving it on the pancakes.

For the Pancakes:
Whisk all ingredients together (quickly after putting them in your mixing bowl, as the coconut oil can solidify and make the batter lumpy).  Heat a griddle or skillet over medium heat.  Add a tablespoon of coconut oil, and when it melts and is shimmering, dispense about 1/4 cup of batter per pancake (less for small kid-sized pancakes).  Allow the first side to cook until there are bubbles coming up in the center of the pancakes, and it’s easy to slide a spatula under them without a bunch of batter running off the middle (about 2 minutes).  Flip the pancakes, and allow the second side to cook for about 2 minutes.  When both sides are golden, serve them up with fresh berries and a dollop of honey butter.  This recipe feeds two adults (4 pancakes each) and 2 kids (6 silver dollar sized pancakes each).

Cheryl’s Tips

If you’ve made the Lemon Ginger Scones, I hope you treated yourself to a citrus zester.  Pull that bad boy out for these pancakes.
I also love my batter dispenser.  It makes perfectly round pancakes, and really cuts down on mess.  We eat pancakes at least once a week, so this seemingly frivolous tool has been very useful.  If you don’t use all the batter, you can cover the dispenser with foil, and use it again in the next few days.  Just add a splash of milk, whisk the batter a little and throw down another batch.
Pamela’s Baking & Pancake Mix is a staple in my pantry.  It’s expensive, but if you if eat gluten-free, it’s worth it.  This magical product keeps our table stocked with waffles, endless varieties of muffins, pizza, biscuits and cinnamon rolls, all without the bloat and constipation.  Now that’s yummy.

Here’s To Sanity and Supper,

Cheryl

5_MG_0872

Gluten-Free Lemon Ginger Scones :: Friday Foodie

February 20, 2014 By: babyproofedparentscomment

LemonScones

These sweet-tart-delightful scones are a mash-up between two of my favorite recipes: Elana Amsterdam’s basic scones (see her amazing gluten-free/paleo website:  http://www.elanaspantry.com), and my sweet friend Sara’s decadent lemon ginger scones.  They are perfectly enjoyed for breakfast or a mid-day snack, and the almond flour adds some healthy protein to the mix.

Ingredients:

The Scones:

  • 2 cups almond flour (sometimes called almond meal)
  • 3/4 teaspoon baking soda
  • 1/2 teaspoon ground ginger powder
  • 1 tablespoon minced fresh ginger
  • 1/4 cup chopped crystalized or candied ginger
  • zest of 2 lemons
  • 1 egg
  • 3 tablespoons agave nectar

The Glaze (optional, but mmmm):

  • 1/2 cup fresh lemon juice
  • 1 cup confectioners sugar

Technique:

The Scones:  Preheat your oven to 350 degrees.  Combine all ingredients except for the the egg and agave nectar in a medium mixing bowl.  In a separate small bowl, whisk the egg and agave nectar together, then mix into the dough, which will be chunky/lumpy and feel like sticky, heavy, gritty play-dough (I know, doesn’t  sound awesome yet).  No need to kneed, just mess with it with your hands or a non-stick spoon until it looks pretty consistent.  On a cookie sheet lined with parchment paper, use your hands to form the dough into a flat circle, about an inch thick.  Use a pizza cutter to slice the dough into 6-8 triangles, and gently move the triangles apart so they’re not touching.  Bake for 10 minutes, until the scones are light brown around the edges.  While they’re baking…

The Glaze: Whisk the lemon juice and confectioners sugar to form a glaze.  If you like thin glaze, you can add more juice, and more sugar will thicken it up like icing.  I used the measurements for my personal favorite consistency, which melts over the warm scones but doesn’t drip everywhere.

Let the baked scones cool for about 5 minutes, put them on a plate and drizzle the glaze over them.  Eat them right now!

Cheryl’s Tips:

Scones are fun to make, because they are very difficult to mess up (a major plus in my book, as baking is not my forte).  Don’t worry if they’re not pretty, because if they’re warm, they’ll be delicious.  Give me taste over aesthetic any day.

These are not only gluten-free, but paleo “friendly” – friendlier if you omit the ginger candy and glaze.  Stay tuned for more about the health advantages of eating gluten-free/paleo foods.  Almond flour is essentially very finely ground almonds – the stage immediately preceding almond butter. You can find it and all of the other ingredients for the scones at your local Whole Foods.

I love my citrus grater. Hold the grater firmly in your non-dominant hand, and your lemon/lime/orange in the other, then lightly rub all sides of the fruit against the grater over a bowl.  It does all the work for you, perfectly zesting the flavorful part of the rind and leaving the white part behind.  Be careful and don’t use too much pressure, as you don’t want to slip and get bodily zest in your food.

Here’s to strength, sanity and family-proofed meals.

Cheryl

5_MG_0872


Connect with BPP

Search The BPP Blog

Online resource for new and expectant parents

Welcome to BPP, an online resource for maintaining your sanity – before, during and after your baby's arrival. I'm Kirsten Brunner and I'm here to support YOU. Read more...

Parenting tips and advice
I'm Published by Mamalode!
TODAY.com Parenting Team Parenting Contributor

Tags

anger anxiety baby birth partner breakfast childbirth co-parenting communication conflict coparenting couple's communication crying dad depression dinner divorce doula easy recipe foodie friends gluten-free healthy hospital kid-friendly labor & delivery laughter love marital marriage newborn parenting postpartum pregnancy prenatal relationship sanity self care sides single parent strength stress stress mgt tantrums tip veggies

Learn About Our Professional Counseling Services

Learn About Our Professional Counseling Services

Pre-Order My Book

Pre-Order My Book

Our Partners

Our Partners

Recognition

Recognition
The Land of Nod, design for kids and people that used to be kids
Tiny Prints - Holiday Offer

For Parents of Multiples

How Do You Do It?

Monthly Archive

The Land of Nod, design for kids and people that used to be kids

Copyright © 2025 · Modern Blogger Pro Theme By, Pretty Darn Cute Design