baby proofed parents

where sane meets baby brain

Subscribe To The BPP Postcard

  • Home
  • About
    • ABOUT KIRSTEN
    • WRITING & MEDIA
    • WORKSHOPS
    • PROFESSIONAL COUNSELING SERVICES
  • PREGNANCY
  • Parenting
  • RELATIONSHIPS
  • WELLNESS
    • ANXIETY
    • DEPRESSION
    • SELF CARE
  • CONTACT
    • WORKSHOPS
    • PROFESSIONAL COUNSELING SERVICES

Gluten-Free Fish Bites :: Friday Foodie

January 16, 2015 By: babyproofedparentscomment

GF_Fish_bites

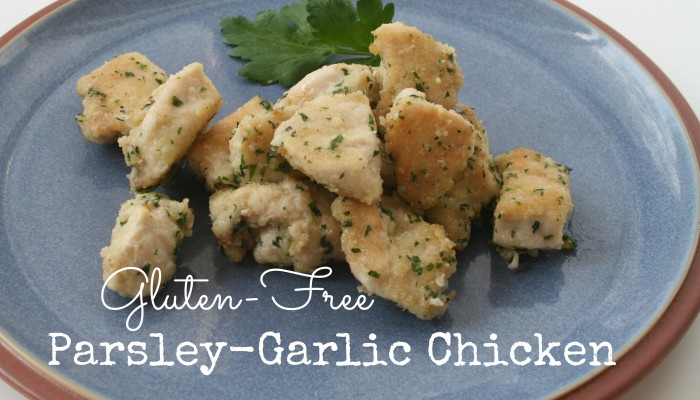
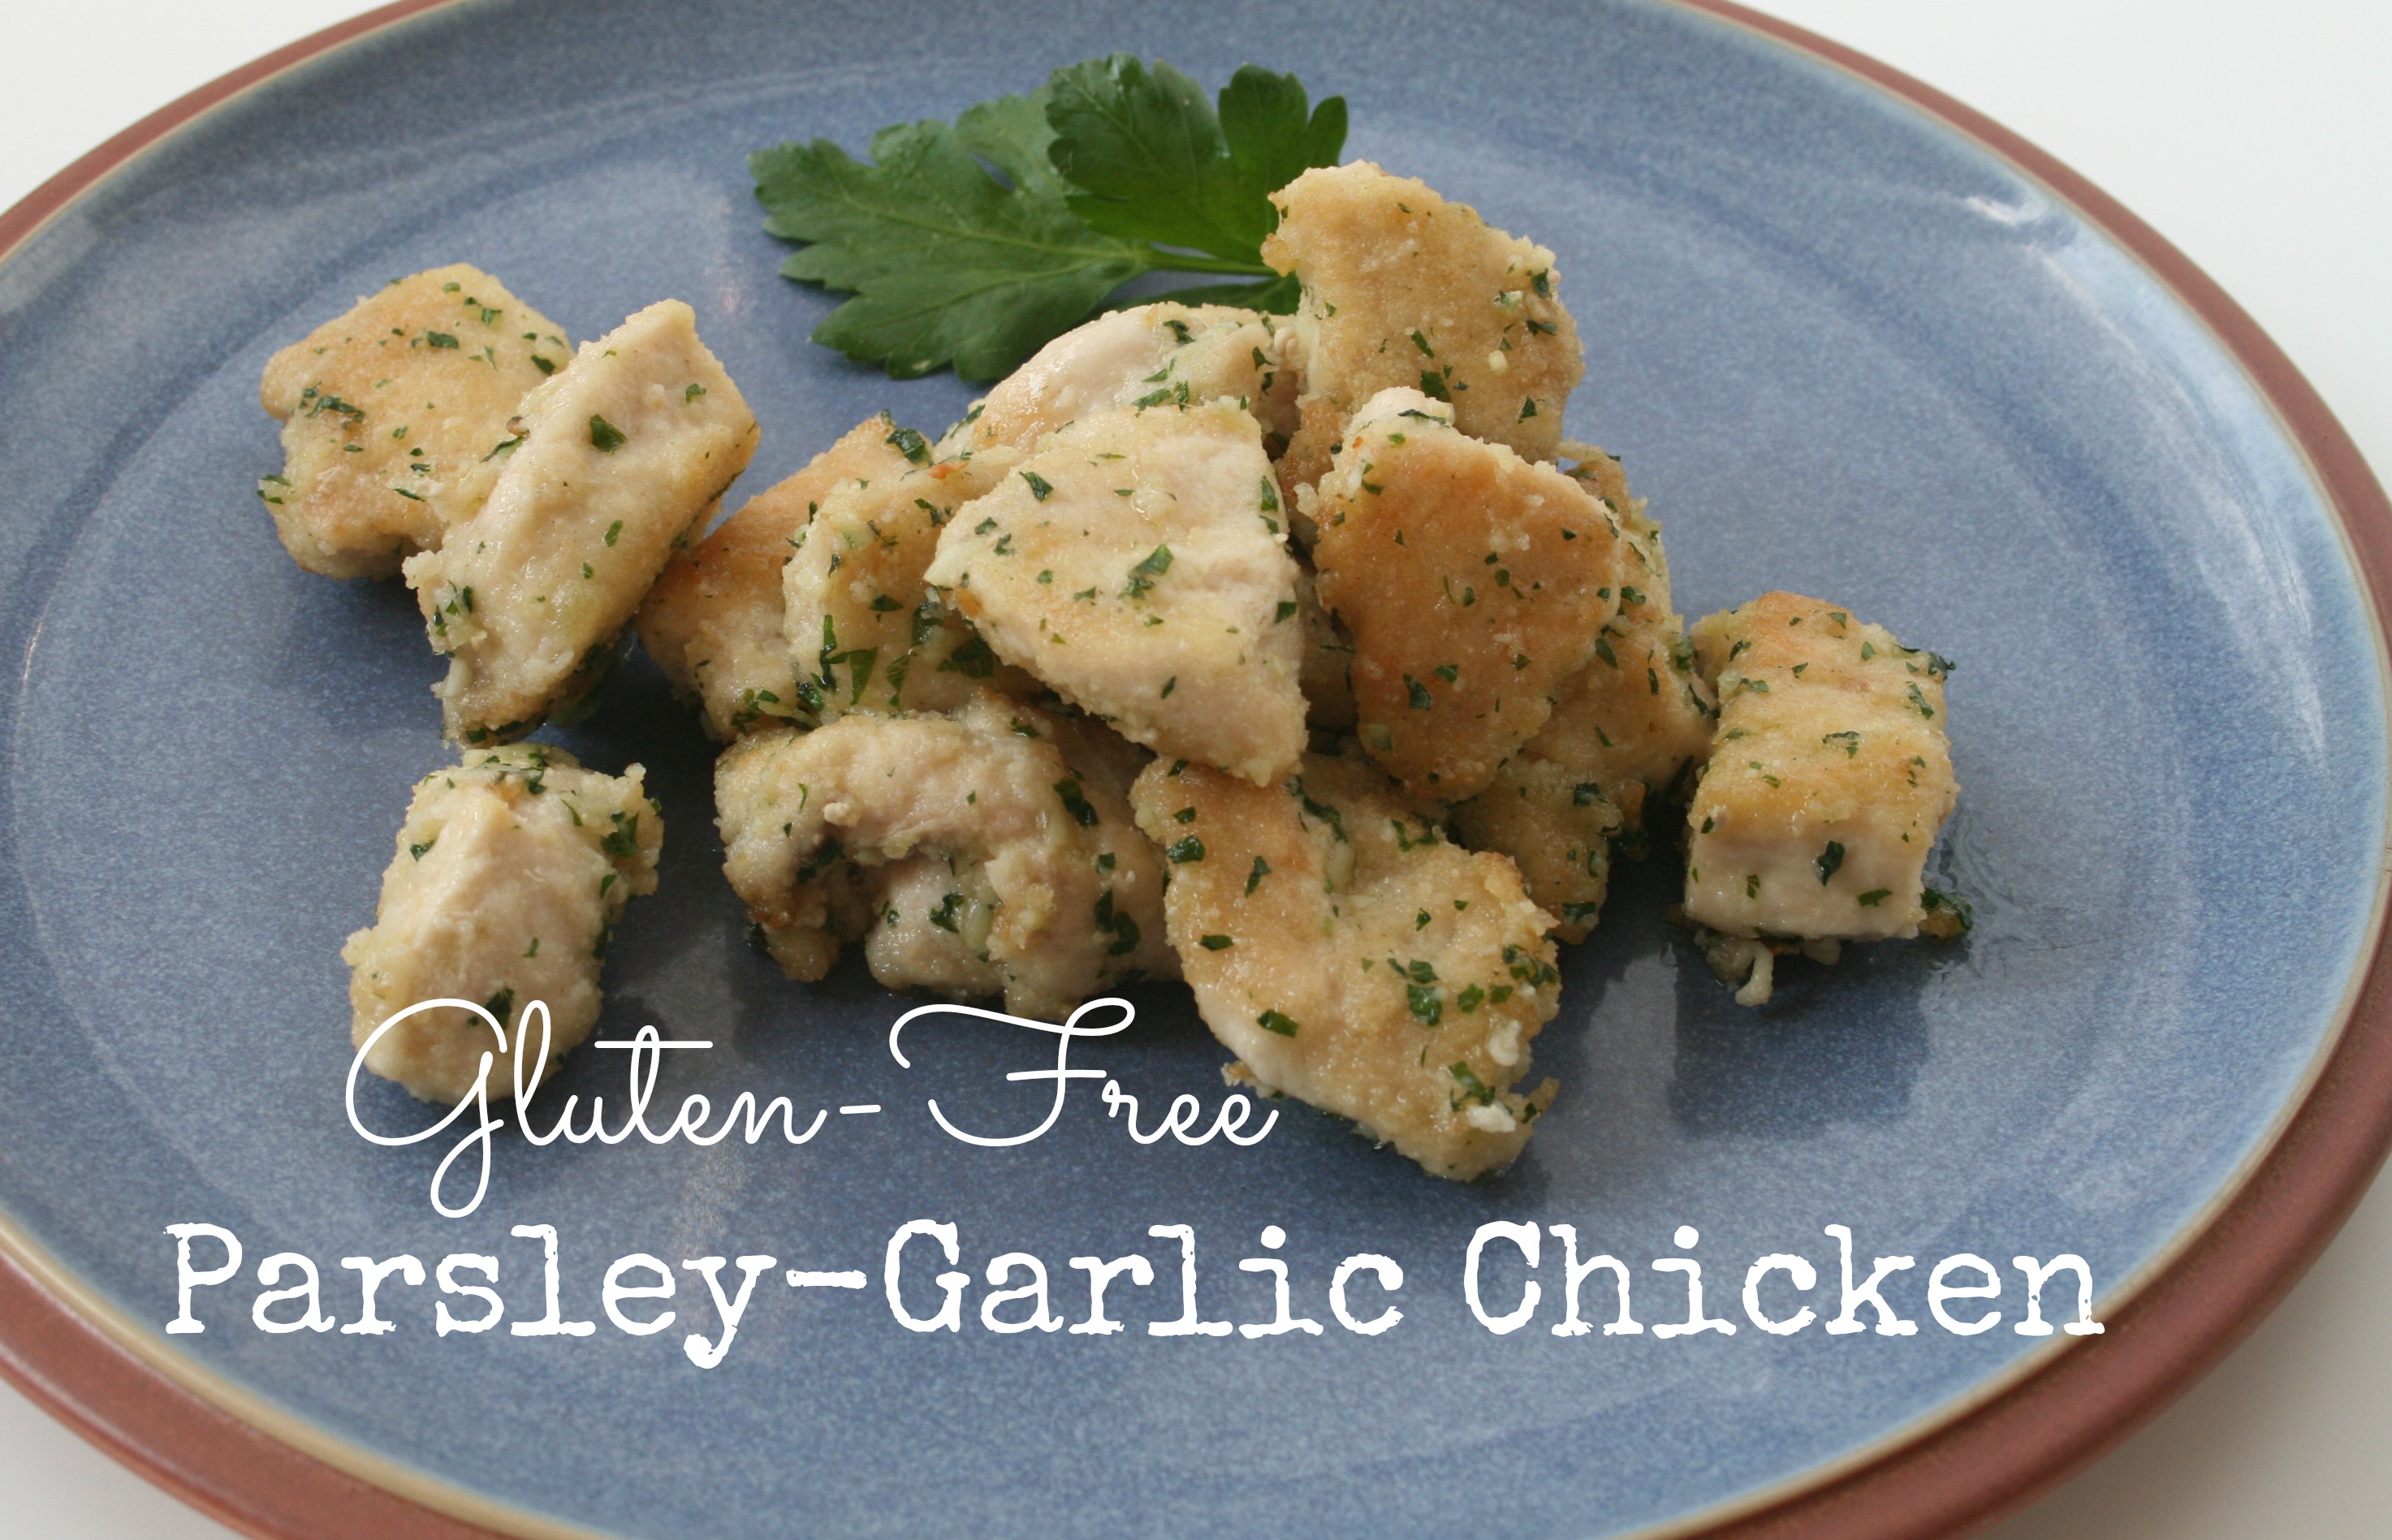
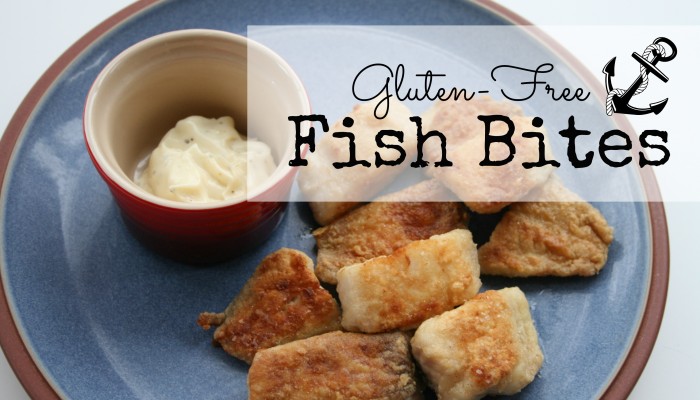
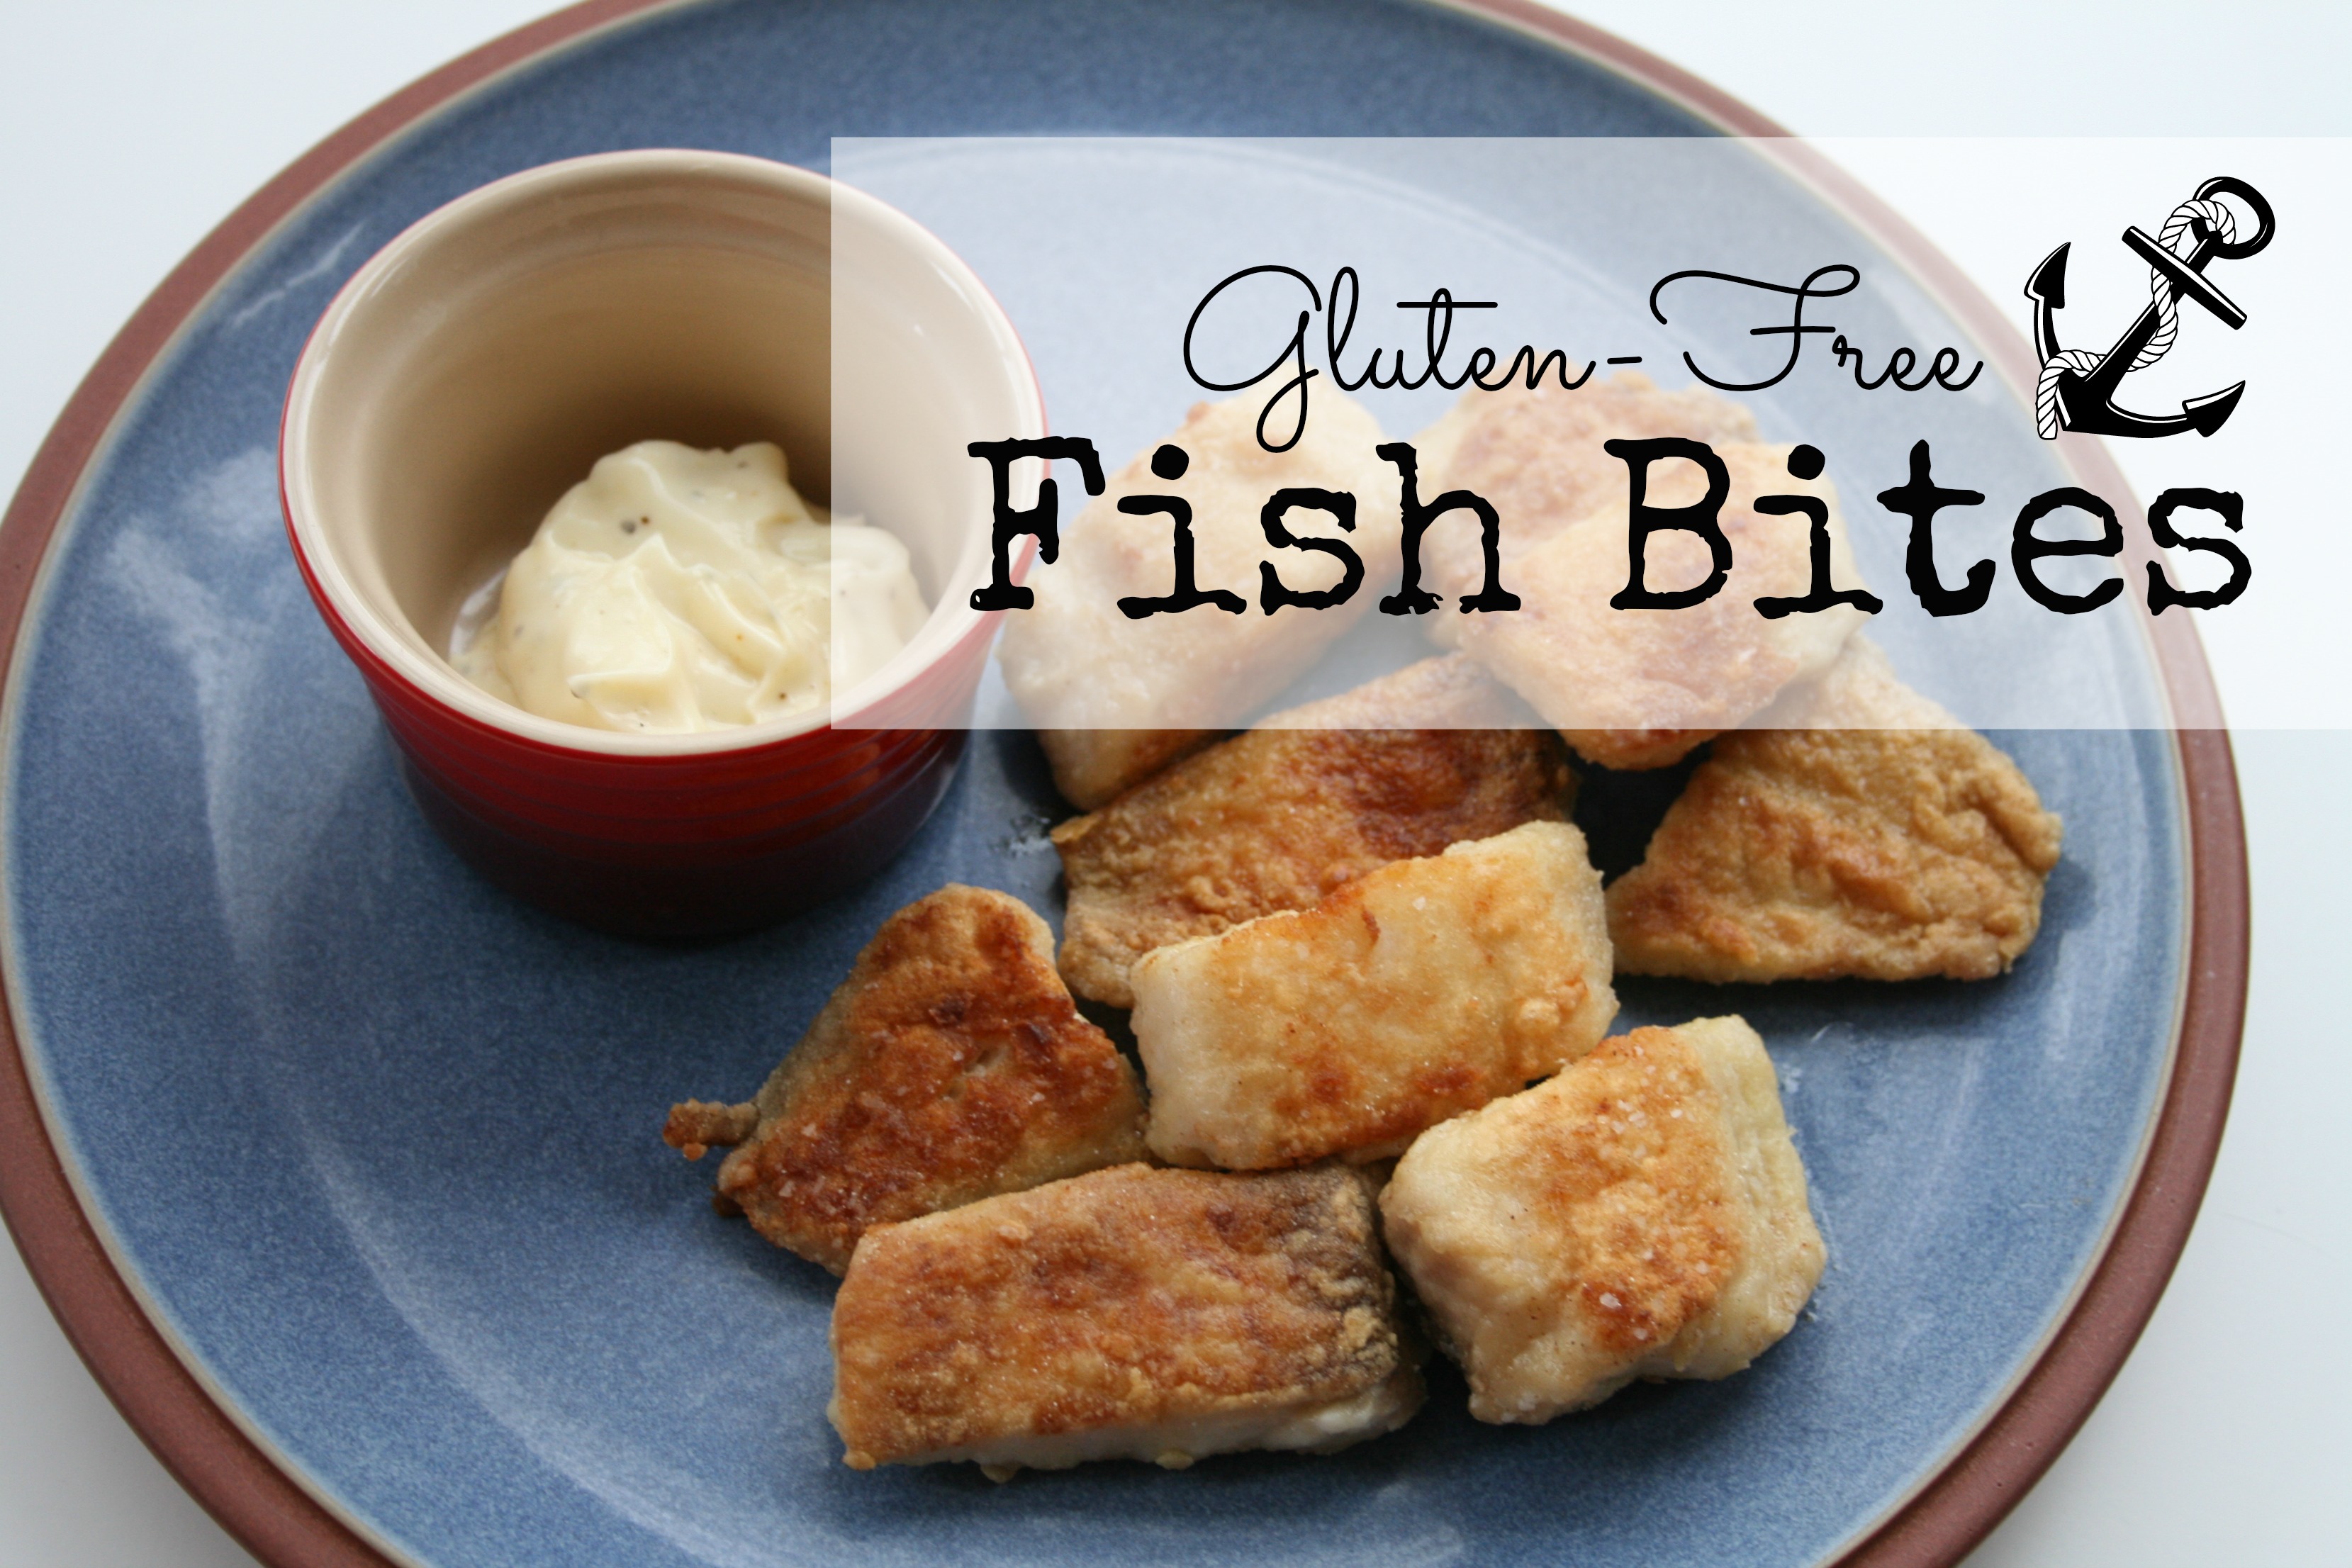
Van De Kamps frozen fish sticks and frozen clams.  A meal I remember from childhood, complete with the little frozen packet of relish we mixed with Miracle Whip to create tartar sauce.  I remember the sound accompanying preparation:  frozen chunks of seafood (or what resembled seafood) cascading through the air to clatter and bang onto a metal baking sheet.  Then the taste and texture…mmm…rubbery.  Damn good, but our fish bites are healthier, and dare I say, even better tasting.  If you’ve tried your hand at our gluten-free chicken tenders you’ll recognize this technique – slow cooking over low heat gives you the lovely, golden result.

Ingredients:

  • 3-4 tilapia filets, rinsed and patted dry
  • 1/2 cup brown or white rice flour
  • 2 tablespoons olive oil
  • kosher salt to taste
  • 1 recipe garlic aioli for dipping

Technique:

Cut the tilapia filets into bite-sized chunks, trying to keep the sizes as uniform as possible.  Place the rice flour in a medium sized bowl, and add the fish, making sure each piece gets coated by the flour.  Meanwhile, heat a large non-stick skillet just below medium for a couple of minutes, add the olive oil, then allow the skillet and oil to heat 2-3 minutes more.  Tap the excess flour off the fish bites, and carefully place them in the skillet in a single layer (you might have to add more oil and do this in two batches).  Sprinkle the fish with a little kosher salt, and swirl the oil in the pan so each piece has a little to sizzle in.  Fry the fish for about 3 minutes, then gently lift one piece with tongs or a thin spatula to check the golden-ness.  When side 1 looks yummy golden brown, carefully flip the fish to side 2, then swirl the oil around the fish again.  If the pan looks dry or it seems the fish is sticking, add a little more oil.  Cook for about 3 minutes, then check to see if side 2 looks golden.  Lightly press the fish with the spatula, and when it feels firm, carefully scoop it out, allowing it to cool for a minute or 2 before serving it with the delicious aioli.

Cheryl’s Tips:

Serve this with oven-fries and malt vinegar… Fish n’ Chips!

When I started getting more serious in the kitchen, my sweet sister gave me a copy of the classic staple The Joy of Cooking for my birthday.  The book has zero photos and reads like a novel.  It forced me to start the habit of reading every recipe I tried from start to finish before heading to the grocery for ingredients and attempting it, because a few times I realized mid-way that I’d missed a very important step that wound up adding a ton of time to the preparation.  Maybe you read, “chicken, parsley, hummina hummina hummina sounds good, go!”  You dive in, and then, when you least expect it, “RUTABAGA.”  AGGHHHHHHH!!!!  Reading ahead prepares you if the recipe involves a technique you’ve never tried or new ingredients you haven’t used.

Here’s To Sanity and Van De Kamps,

Cheryl

5_MG_0872

Gluten Free Ziti with Sausage & Veggies :: Friday Foodie

December 19, 2014 By: babyproofedparents2 Comments

gluten-free_pasta

Okay, glorious Readers.  I promised this recipe long ago, and most of you have been patiently waiting.  Others of you have been almost harassing in your repeated requests, comments, emails…settle DOWN, please.  This recipe tethers you to the stove for about 20 minutes, so plan accordingly, knowing the result will be scrumptious and well worth it.  Stove bondage creates a nice excuse for someone else to parent while you throw ingredients around and yell, “Blamblamblah!”  Sexy!  Lots of veggies (kale, spinach or broccoli) work for the hidden, nutritional puree in this recipe; if you have leftover braised collards, roasted Brussels sprouts or roasted cauliflower use one or a combination.

Ingredients:

  • 3/4 lb dried gluten free ziti
  • 1 T olive oil
  • 1/2 pound Italian Sausage (spicy or sweet)
  • 1/2 cup pureed prepared veggies (photo features a combo of brussels sprouts and cauliflower)
  • 1/4 cup marsala wine
  • 1/2 cup chicken stock
  • 2/3 cup heavy cream
  • 1/2 cup freshly grated parmesan cheese
  • kosher salt and freshly ground black pepper

Technique:

Follow your pasta package cooking instructions to prepare your ziti.  When you add the pasta to the boiling water, it’s time to start your sauce.  You’ll be stirring the pasta while executing the sauce steps.  It will all come out around the same time, rendering you a cooking genius.  Place a large skillet over medium high heat.  After a couple of minutes, add the olive oil.  When the oil is shimmery, add the sausage and cook, breaking it into small pieces with a wooden spoon.  When the sausage is browned, add the pureed veggies and sauté for 1 minute.  Add the marsala, and allow it to bubble and reduce for 30 seconds, then use the spoon to scrape all the brown yumminess from the bottom of the skillet.  Add the chicken stock, stirring to combine.  Allow the stock to simmer for about 3 minutes.  Stir in the cream, and simmer for about 3 minutes more, stirring occasionally, making sure to keep scraping up all the goodness from the bottom and
sides of the skillet.

By now your ziti should be ready.  Drain but don’t rinse it (the starchy water on the pasta will make the sauce cling more tightly), and add it to the skillet along with the cheese, 1/2 teaspoon kosher salt and a few grinds of black pepper.  Stir it all together over the heat until the cheese is melted and the whole skillet looks golden and perfect.  Dish it up and eat it up!

Cheryl’s Tips:

I’ve tried em’ all, and my favorite gluten free pasta is Tinkyada.  They have a huge variety (including lasagne sheets), and are easy to prepare.  The only drawback to gluten free pasta is that once cooked, it tends to be slightly fragile, but super yummy.  Kind of like some of my favorite people.  Taste your pasta before draining it; it’s perfect when it’s still a tiny bit firm, but not chewy or stick-to-your-teethy.  Cooking too much longer can make it squishy.

I learned this in a Thai cooking class.  Allowing your skillet to heat up for a couple of minutes before adding your oil allows the pan to expand, soaking in more of the oil, thus decreasing the chances that your food will stick or burn while cooking.  Magic!  No…Science!  No…Magical Science!

Let’s talk about aprons.  If you don’t own one, I suggest buying one at your first opportunity (it’s easy to find super cute and sexy 50’s style lines that will dress up your sweat pants) and wearing it habitually when you cook.  Working with fire and oil can make you instinctually curl slightly away from food prep.  You’re protecting your clothes and body from staining and burns, but the apron reduces the need for that.  Get close to that heat!  Less fear = more action = decadent food.  You may draw whatever life/psychological parallels you wish here, for there are many.

While you cook, listen to this.

Here’s To Sanity and Magical Science,

Cheryl

5_MG_0872

Gluten-Free Chicken Tenders :: Friday Foodie

October 10, 2014 By: babyproofedparentscomment

GF Chicken Tenders

The slow frying of these tenders is what makes them juicy and perfect.  If you cook them too quickly, the outside gets overly dark while the inside doesn’t fully cook through, resulting in burnt and chewy chicken.  Slow and low is counter to my preference of cooking too fast, too furiously… of doing many things too fast, too furiously.  Naturally, there’s a psychological parallel here.  Sometimes speed is the need – you have to act impulsively to keep life interesting and honor your gut, even at the risk of burnt, chewy crap.  But, making yourself sllloowwww down and catch a breath (ideally engaging your left brain) can make all the difference in quality.  All about balance, ya’ll. 

Ingredients:

  • 3 boneless, skinless chicken breast halves, cut into strips length-wise (about 4 strips per breast)
  • 1/2 cup white rice flour
  • 2 eggs
  • 3 slices gluten free sandwich bread, finely crumbled
  • kosher salt
  • 1/4 cup olive oil


Technique:

Grab three medium sized bowls.  Put the rice flour in one bowl.  In the second bowl, whisk the eggs until well beaten, and put the bread crumbs in the last bowl.  Place a large wire rack on your counter (over a couple of paper towels if you want to minimize the mess factor).  Line up your bowls, and get ready to dip.  One strip at a time, coat the chicken in first the rice flour, then the beaten egg, and then the breadcrumbs, carefully placing the strips on the wire rack to slightly dry.  This can get very gooey, so if you have them, use plastic gloves.  Don’t worry if you run out of one of your dipping elements, simply pause to crumble up more bread or throw in another beaten egg, until all of the chicken is coated.

Sprinkle the tenders generously with kosher salt.  In a large skillet, heat the olive oil over medium to medium low until it’s shimmering, but not smoking hot (like you are).  Carefully place the chicken strips in the oil (don’t crowd them, and know that you’ll probably have to cook at least 2 batches depending on the size of your skillet).  Fry the strips on the first side for about 5 minutes, and when they’re golden toasty brown, use tongs to flip them to the other side and cook about 3-4 minutes more.  Gently press your tongs against the tenders.  If they feel squishy, lower the heat to medium low and cook them a minute or two more.  When they feel firm and are golden all over, remove them to a clean wire rack and let them cool for about 5 minutes (this time allows them to cook a little longer with the residual heat).  Lovely.  Dig in!

Cheryl’s Tips:
I photographed the tenders alongside our garlic aioli, a delicious accompaniment.  The chicken tastes best the day it’s made, but you can reheat it by toasting in a 350 degree oven for about 7-10 minutes.  My favorite way to eat leftovers is chopped and added to a Cobb salad. 

Smile extra big as you eat this chicken, knowing you prepared it from 100% love and acceptance, unlike some chicken, at a certain chain restaurant.  Just sayin’. 

Here’s To Sanity and Slowing Your Roll,

Cheryl

5_MG_0872


Val’s Spicy Turkey Chili :: Friday Foodie

September 12, 2014 By: babyproofedparents2 Comments

spicy turkey chili

I know it’s still sooo hot in Austin, but September means that fall, my favorite season for cooking and clothes, is around the corner.  Central Market has started stocking pumpkins, which makes me want to skip through the produce section.  So, I’m going to pretend fall is already here and share a nice hot recipe with you.  My friend Val is a great cook, and a badass.  That’s why this chili is so good.  I love how she and her husband James cook together.  They take a recipe, prepare it as written the first time, and after sampling it, they modify, modify, modify until it’s perfect.  And their version of perfection is so right. Enjoy with a cold IPA and pretend it’s not a 100 degree sauna outside.

Ingredients:

  • 1 tablespoon olive oil
  • 1 cup chopped onion
  • 2 cloves garlic, finely chopped (I have old recipes that refer to cloves as “buttons”, which makes me want to knit a vampire-retardant sweater with garlic buttons on it)
  • 1/2 cup chopped red bell pepper
  • 1 lb ground turkey breast
  • 1/4 cup chopped cilantro leaves
  • 1 bunch lacinato kale, stems removed and leaves coarsely chopped (optional)
  • 3 1/2 cups chicken stock
  • 1 cup beer (Pabst Blue Ribbon, or for a lighter flavor, and so you can still have beer left to drink after measuring the cup for the chili, Sapporo)
  • 2 tablespoons chili powder
  • 1 tablespoon kosher salt (less if you’re sensitive)
  • 1 teaspoon ground cumin
  • 1 small can diced green chilis
  • 1 14 1/2 oz can diced rotel tomatoes
  • 1 6 oz can tomato paste
  • 1 can refried black beans

Technique:

In a large dutch oven, heat the olive oil over medium high.  Add the onion and sauté until it’s transparent and softened.  Add the chopped garlic and continue cooking until the garlic is fragrant, about 1 minute.  Add the bell pepper and cook 2-3 minutes more.  Then add the turkey breast, and cook, breaking the meat apart with a wooden spoon, until it’s no longer pink.  Then you add everything else!  I love this part, dumping in a bunch of cans and seasonings and stirring until it’s all smooth.  Bring the chili to a boil, then reduce the heat and simmer over medium-low heat, stirring occasionally, for about 45 minutes to an hour, until the liquid reduces and it’s the perfect thickness.   I add the optional chopped kale to sneak in some veggies, and top with a little daiya cheese and Veggie Pirate’s Booty for my kids, and for me, a dollop of sour cream and some blistered shishitos for extra heat.

Cheryl’s Tips:

To prevent crying while chopping onions, put on a pair of sunglasses. Not only does it prevent your eyes from stinging/burning, it makes you look amazing in that ironic, “Too Cool for Others” way.  If you’re a child of the 80’s, you’re extra awesome, and you can sing this little diddy to the tune of Corey Hart’s “Sunglasses at Night”:  “I wear my sunglasses inside, so I can so I ca-an chop onions without tears in my eyes…”

Here’s to Sanity and Fall,

Cheryl

5_MG_0872

Gluten-Free Parsley-Garlic Chicken :: Friday Foodie

March 27, 2014 By: babyproofedparentscomment


parsley_chicken

This is a gluten-free version of a classic recipe Jacques Pépin prepared on one of his PBS shows.  Jacques is awesome.  My favorite series is “Cooking With Claudine” (his daughter); for the food, but even more for their fascinating relationship dynamic, which includes Claudine’s habit of snapping at Jacques each time he gently suggests she alter her cooking technique.  I LOVE being a therapist.  This dish is easy to prepare, has very few ingredients, and is a great kid alternative to chicken nuggets – I’ve served it to a few picky eaters who inhaled it despite the green.

Ingredients:

  • 4 boneless, skinless chicken breasts
  • 1/2 cup brown rice flour
  • 1/2 cup loosely packed Italian parsley leaves
  • 2 cloves fresh garlic
  • 1 teaspoon kosher salt
  • 2 tablespoons grape seed oil
  • 1 tablespoon unsalted butter, cut into small pieces

Technique:

Cut the chicken into 1 by 1 inch pieces (for extra info on preparing boneless breasts, see my tips below).  Place the chicken in a Ziplock bag with the brown rice flour, seal and shake (the bag, and your body too if you’re into it) until all the pieces are coated.  Chop and chop and chop the garlic and the parsley, mixing them together on the same cutting board, scooping them into a pile with your knife and then chopping them again until you get this consistency:

choppychop
You can see it’s not as finely chopped as pesto, but there aren’t big chunks either.  Heat the grape seed oil in a large skillet over medium-high until it’s shimmering, then carefully place the chicken pieces in a single layer (you might have to do this step in two batches, placing the first cooked batch on a plate while the second is browning). Let the chicken cook until it’s lightly browned on the first side, and you can see that some white is creeping up over the pink edges (about 2-3 minutes).  Flip the pieces with tongs and brown the other side, about 2-3 minutes more.  If you did batches, add the plated chicken back to the skillet, and then add your beautiful parsley-garlic choppy-chop.  Using a wooden spoon, stir-fry the chicken until it’s coated with the parsley and garlic, and you can smell the garlic releasing that yummy smell (usually about 2-3 minutes – keep an eye on the garlic and try to keep it from browning).  Add the butter pieces and the salt, and continue stirring until the butter has melted over the chicken, and the whole pan looks like sizzling, golden decadence (about 1-2 minutes).  Dish it up and dig in!

Cheryl’s Tips:

Boneless, skinless chicken comes in many sizes.  I try to buy organic when I can, which usually means a smaller breast.  If you’re using the bigger size, you’ll notice one end is much thicker than the other.  A trick: place the breast in a sealed Ziplock bag and use the smooth side of a meat tenderizer mallet to pound it out until the breast is at a uniform thickness, which will make it easier to cut into consistently sized pieces, or, if you want to keep the breast whole, it will cook evenly and to perfection. How efficient to simultaneously prep food and process anger?  I didn’t have a mallet for many years, simply washing and using the flat side of a hammer.  MacGruber.

I gave measurements for 2 adult and 2-3 kid-sized portions. The one downside to this dish: the left-overs are lackluster, so prepare just enough to feed your family for one meal.

Here’s to Sanity, Jacques and MacGruber,

Cheryl

5_MG_0872


PS: For those of you who are Bloglovin’ followers, you can now find our blog on their gorgeous roster. And we’re lovin’ it. : )

Follow on Bloglovin

Mandy’s Meatballs :: Friday Foodie

February 6, 2014 By: babyproofedparentscomment

mandy meatballs

These delicious meatballs are adapted from a recipe that came from one of the coolest mamas we know (you’ll be hearing more from her down the road).  My favorite thing about this dish is that every savory bite is a perfectly nutritionally balanced… and as you’re gathering, we’re all about the balance.  Also, they freeze really well, so double up and save half for a night when you’d rather play than mess up the kitchen.

Ingredients:

  • 1 pound ground grass-fed beef or bison
  • 1/2 pound pork, chicken or turkey Italian sausage (spicy or sweet)
  • 1 cup steamed white or brown rice
  • 1/2 c finely chopped onion
  • 1/2 c finely grated zucchini
  • 1 teaspoon salt
  • 1/2 teaspoon black pepper
  • 1 teaspoon Spike Seasoning (optional)
  • 1 16 ounce can tomato sauce

Instructions:

Preheat oven to 350 degrees.  Mix all ingredients except for the tomato sauce.  Form into 1 inch balls, and place in a lightly greased casserole dish.  Drizzle the tomato sauce over the meatballs, and bake uncovered for 1 hour.  Stand in your kitchen, and breathe deep – they smell amazing and taste even bettah.

Cheryl’s Tips:

What’s Spike Seasoning?  The bomb.  A yummy, natural seasoning alternative to typical blends that use msg and other junk that’s hard to pronounce.  Look for it at your local health food store, or at http://spike-it-up.com/

Another kitchen tip:  Keep a box of surgical gloves handy (tee hee) for forming meatballs, deboning chicken, etc.  Keeps gunk out from under your gorgeous fingernails and makes clean-up easy.

Here’s to strength, sanity and really yummy meals.

Cheryl

5_MG_0872

Connect with BPP

Search The BPP Blog

Online resource for new and expectant parents

Welcome to BPP, an online resource for maintaining your sanity – before, during and after your baby's arrival. I'm Kirsten Brunner and I'm here to support YOU. Read more...

Parenting tips and advice
I'm Published by Mamalode!
TODAY.com Parenting Team Parenting Contributor

Tags

anger anxiety baby birth partner breakfast childbirth co-parenting communication conflict coparenting couple's communication crying dad depression dinner divorce doula easy recipe foodie friends gluten-free healthy hospital kid-friendly labor & delivery laughter love marital marriage newborn parenting postpartum pregnancy prenatal relationship sanity self care sides single parent strength stress stress mgt tantrums tip veggies

Learn About Our Professional Counseling Services

Learn About Our Professional Counseling Services

Pre-Order My Book

Pre-Order My Book

Our Partners

Our Partners

Recognition

Recognition
The Land of Nod, design for kids and people that used to be kids
Tiny Prints - Holiday Offer

For Parents of Multiples

How Do You Do It?

Monthly Archive

The Land of Nod, design for kids and people that used to be kids

Copyright © 2025 · Modern Blogger Pro Theme By, Pretty Darn Cute Design