baby proofed parents

where sane meets baby brain

Subscribe To The BPP Postcard

  • Home
  • About
    • ABOUT KIRSTEN
    • WRITING & MEDIA
    • WORKSHOPS
    • PROFESSIONAL COUNSELING SERVICES
  • PREGNANCY
  • Parenting
  • RELATIONSHIPS
  • WELLNESS
    • ANXIETY
    • DEPRESSION
    • SELF CARE
  • CONTACT
    • WORKSHOPS
    • PROFESSIONAL COUNSELING SERVICES

Paleo Crepes with Berries :: Friday Foodie

July 4, 2014 By: babyproofedparentscomment

Paleo Crepes with berries

I wish I was a crepe flipper.  Someday, I will conquer my Flip Fear and master this dramatic and sexy cooking technique.  But first, I have to break through my emotional barriers, which are two-fold.  One barrier is triggered by the sensitivity of crepes.  Notice the repeated use of words like “gently” and “carefully” in this recipe.  Crepes tear easily, which can unfairly place them in a “victim” role, and me in an overly-protective “savior” role, thus keeping them from their golden, air-born potential.  The second barrier is triggered by the part of me fundamentally opposed to wasting food.  I hold the pan, ready to go for it, and then think, “What if I flip and miss?  Crepe on the floor, or scorched by the range…lost.  What if I start crying and can’t stop?”  I’ll stick with the spatula.

Ingredients:

  • 6 bananas
  • 4 tablespoons protein powder (I use vanilla whey)
  • 4 eggs
  • 4 tablespoons butter
  • 1 tablespoon toasted coconut
  • 1 tablespoon toasted chopped pecans
  • 1/2 cup fresh blueberries
  • 1 recipe stewed cherries

Technique:
Check out our GF Orange Glazed Muffins with Stewed Cherries recipe for a quick and easy cherry sauce.  It will take you about 10 minutes to throw together before you proceed with the crepes.  See you back here in a few?

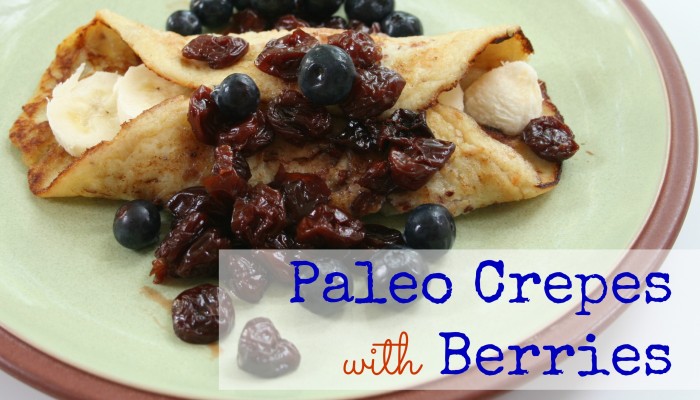
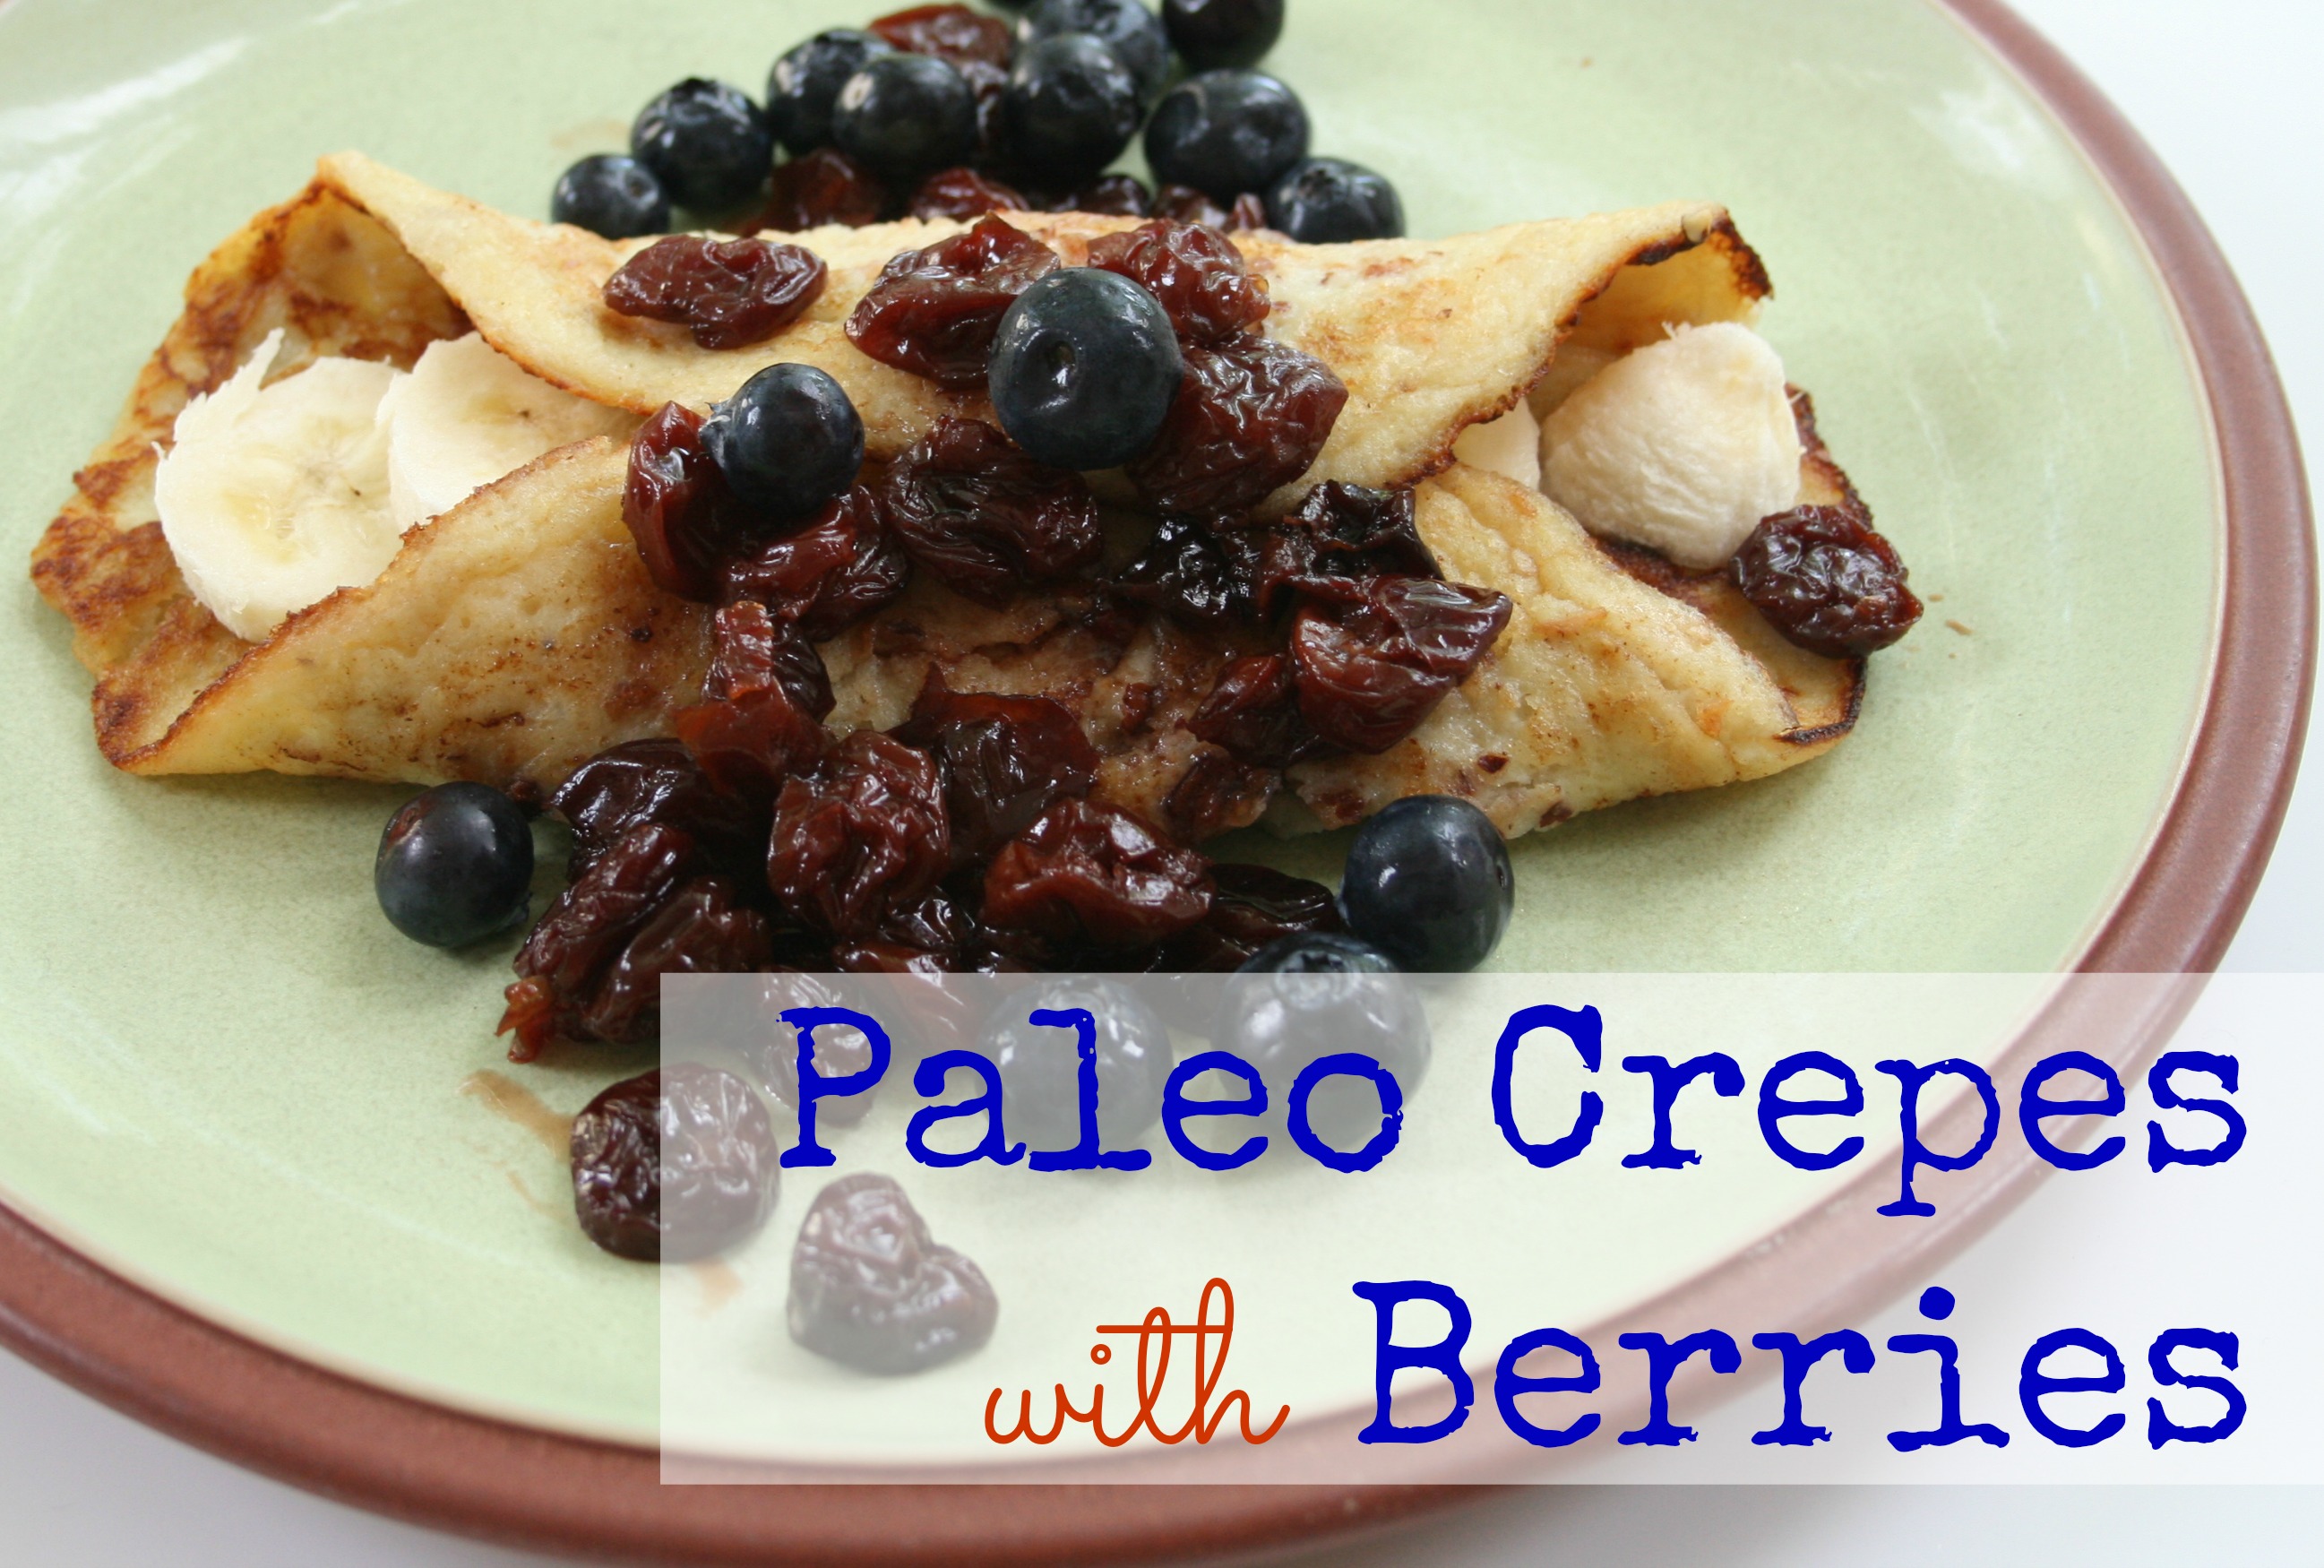
In a medium mixing bowl, mash 4 of the bananas.  Add the eggs and the protein powder, and whisk until well blended.  In a non-stick skillet (see suggestions in my tips below) over medium heat, melt 1/2 tablespoon of the butter.  Spoon in enough crepe batter to make a thin, circular layer about 8 inches in diameter.  Sprinkle about 1/2 teaspoon each of the coconut and pecans over the cooking crepe.  After about 2 minutes, you should see a little browning around the edges.  Gently slide a spatula under the center of the crepe, and very carefully flip it over.  Or, if you’re feeling emotionally stable, try air flipping!  Let the crepe cook for another minute, then slide it onto a serving plate.  Repeat this process until you’ve used all the batter, yielding about 8 crepes.  Thinly slice the remaining 2 bananas, and fill the center of each crepe with about 6 slices.  Fold the edges of the crepes over the bananas, and top with 1/4 cup of stewed cherries and a few blueberries.  That is pretty.  Eat it.

Cheryl’s Tips:
Blog recommendation:  these crepes were inspired by Paleo Goddess Juli Bauer’s lovely Protein Pancake recipe.  Juli’s site is packed with deliciousness – an excellent go-to resource for all things Paleo.

I like Tim Ferriss like Tim Ferriss likes Angelina Jolie.  His awesome book The 4 Hour Chef is full of recipes and techniques based on his extensive research with accomplished chefs, and his own experimentation.  His “Top Gear” section lists tested kitchen gadgets to greatly enhance your cooking life.  I have two sizes of the Bialetti Aeternum non-stick skillet he recommends – I love how well they work, and that they are infinitely easier on the environment than most non-stick ware.

Try these crepes for a fancy dessert – filled with vanilla coconut milk ice-cream and topped with either the cherry sauce or melted chocolate.  Yum.

Here’s To Sanity and Flipping,

Cheryl

5_MG_0872

Banana Nut Smoothie :: Friday Foodie

June 20, 2014 By: babyproofedparentscomment

smoothie2

Have you been saving overripe bananas in your freezer as instructed in our Paleo Banana Bread recipe post?  Good job.  In my recipe-writer fantasy, you’ve been waiting on the edge of your seat, gazing at least once a day at your growing frozen banana stash, scratching your head, gesturing with theatrical inquisition toward the ceiling and asking out loud, “WHEN is she going to give us that amazing smoothie recipe?!”  Beautiful, dedicated reader, your patience is about to be rewarded.  This smoothie cures what ails.  It makes a complete meal, is especially lovely for breakfast, and kiddos dig it.  Add the optional spinach leaves and protein powder to take the nutritional value over the top.  Sip, and levitate.

Ingredients:

  • 3 bananas, cut into chunks and frozen (freezing them makes all the difference)
  • 3 heaping tablespoons nut butter (my favorite is a combo of roasted almond butter and sunflower butter)
  • 1/2 cup plain yogurt or kefir
  • 1/2 cup milk or milk alternative (vanilla almond milk.  mmmm.)
  • 1 tablespoon whey protein (optional)
  • 1 cup loosely packed baby spinach leaves (optional)

Technique:
Put all that goodness into your blender and blend it well, baby.  My measurements result in about 4 small, very thick smoothies, the consistency of slightly melty soft serve.  If you like your smoothies more drinkable, simply add more milk.

Cheryl’s Tips:
Being raised by post-depression era farm folks conditioned me to feel physical pain when good food is thrown away.  I will trashcan dive if anyone tosses eggshells, apple peels, or anything that could be composted, and I love finding uses for dregs.  When you use fresh nut butter, you often have to stir and stir to combine the oil and nut solids.  At the bottom of the jar, there’s usually a thick, nutty layer that’s hard to spread without destroying your bread.  I scrape this out and toss it into the blender.  And on the rare occasion that there’s a leftover heel from a loaf of b-bread, it blends beautifully into the smoothie and gives it a tiny hint of chocolate.  Nothing wasted.  Your mouth will love the taste, your body will love the nourishment, and the part of your conscience that is in constant turmoil about the state of our environment will take a deeply satisfying breath.

Here’s To Sanity and Levitation,

Cheryl

5_MG_0872

GF Orange Glazed Muffins :: Friday Foodie

June 6, 2014 By: babyproofedparentscomment

Orange_Muffin

There was no “Home Ec” in my high school.  There was, however, “Food Science and Nutrition,” or “FSN” to those in the biz.  We were sooo progressive.  In FSN, I learned all about the complex sensitivity of muffin batter.  If you over-mix it, the muffins can come out full of funky air tunnels.  While some people love to play “6 Degrees of Separation,” I prefer “Turn Everything Into a Mental & Emotional Health Promotional Opportunity.”  Let’s liken over-mixing the muffin batter to overanalyzing/doubting oneself when on the verge of making a major life change, such as embarking on a new career path.  If you question yourself too much, you can stay stuck, infusing your life with tunnels of stagnant air instead of consistently fluffy, magical deliciousness.  Bam!!

Make these easy, orange-tastic muffins with some scrambled eggs tomorrow morning, and watch your day unfold perfectly from there.

Ingredients:

For the Cherries:

  • 1 cup dried, sweetened sour cherries
  • 1/2 cup water

For the Glaze:

  • 2 tablespoons frozen organic orange juice concentrate
  • Up to 1 cup powdered sugar, sifted

For the Muffins:

  • 1 1/4 cups Pamela’s Pancake and Baking Mix
  • 1 egg
  • 1/4 cup plain yogurt or kefir
  • 1/4 cup milk or milk alternative
  • 1/2 cup honey or agave nectar
  • zest of one orange (another opportunity to use your awesome zester – hooray!)
  • 1 teaspoon pure vanilla extract
  • 1/4 cup finely grated zucchini (optional)

Technique

For the Cherries:
In a small saucepan, combine the cherries and water.  Bring to a boil over medium-high heat, stirring occasionally.  Reduce the heat to low and simmer until the cherries have softened and absorbed all but about 1/4th of the water.  Turn off the heat and allow to cool slightly. While cooling, the cherries will absorb a little more water, resulting in a yummy compote to spread over the muffins.

For the Glaze:
Start by whisking the frozen concentrate with 3 tablespoons of the powdered sugar.  The concentrate will melt quickly, and when the mixture is smooth, gradually whisk in the rest of the sugar until it’s slightly thicker.  These measurements make my favorite glaze consistency – it coats the muffins and drizzles onto the plate for dipping every bite.

For the Muffins:
Preheat your oven to 350 degrees.  Combine all the ingredients with a wooden spoon in a medium mixing bowl.  Gently stir until everything is incorporated and no streaks of baking mix or egg show up in the batter, but remember to avoid over-mixing it.  Scoop the batter into a well-greased 6-cup muffin pan, filling each cup to slightly below level.  Bake for 20 minutes or until very lightly browned.  Cool the muffins on a baking rack for about 5 minutes before carefully removing them from the pan, as gluten-free goodies have a tendency to stick.  Drizzle about a tablespoon of glaze over each warm muffin, serve with a small scoop of your lovely cherries, and enjoy!

Cheryl’s Tips:

If you’ve been following our recipes, thank you, and you might wonder why zucchini is in almost everything?  First, it grows like crazy here in Austin, so I try to find creative uses for it.  Second, it is incredibly easy to hide in baked goods and pasta sauces, adds a tiny bit of veggie goodness, and helps me feel less anxious about my children’s ongoing refusal to eat anything green.

I tried making the glaze with the juice of the orange, which seemed more practical, and in theory, tastier.  It fell flat.  The concentrate has such a powerful orange flavor, which is necessary to adequately compliment the milder flavor of the muffin itself.

Those cherries.  Mmmm.  Another decadent use: over frozen vanilla yogurt or a warm brownie.  The same stewing technique works well with other dried fruit, like apricots or plums.  I’ll save the Mental & Emotional Health/Stewing Promo for another time.

Here’s To Sanity and FSN,

Cheryl

5_MG_0872

Fast Times Marinara :: Friday Foodie

May 23, 2014 By: babyproofedparentscomment

fast-marinara

No jar can beat you.  You are invincible.  Your marinara will make people laugh and cry and wonder who they really are.  I’ve had 2 cups of coffee.  This easy, vibrant sauce is a staple in my kitchen, and is worth the extra work to prepare from scratch.  Why?  Most pre-made pasta sauces have added sugar.  Get used to making your own, go back for a taste of pre-made, and you’ll detect the sweetness immediately.  I’d rather get my sugar from a cold IPA and a gigantic brownie topped with 85% dark chocolate ganache and a cherry-port reduction, wouldn’t you?  I’ve showcased the marinara’s beauty topped with grated parmesan over thinly sliced, sautéed zucchini.  It’s also perfect with pasta, spaghetti squash, or as a simmering sauce for halibut.  If you prefer a meaty sauce, add browned ground bison or Italian sausage.  I double the batch, freezing it up for future deliciousness.

Ingredients:

  • 2 tablespoons olive oil
  • 1 medium onion, chopped
  • 2 cloves fresh garlic, halved length-wise and thinly sliced
  • 2 28 ounce cans San Marzano Italian whole plum tomatoes
  • 1/2 cup loosely packed, chopped fresh flat Italian parsley or basil leaves
  • 2 teaspoons kosher salt

Technique:

Heat a large skillet over medium heat.  Add the olive oil, and when it’s shimmering, add the onion.  Breathe in that divine smell, and you’ll be shimmering too.  Sauté until the onion softens and is transparent.  Add the garlic and sauté about 3-5 minutes more.

(Want softer hands?  Before this next step, rub those hard-working beauties with some coconut oil and slip on a pair of surgical gloves.  To protect your skin, keep a box of gloves handy for preparing meat, peppers, or in this case, acidic foods.)

Pour in the juice from the tomato cans, then use your fingers to carefully break the tomatoes into pieces and drop them into the skillet.  Add the salt, and simmer the sauce for about 20 minutes, stirring occasionally until it’s thickened a bit.  Add the parsley or basil, and simmer about 5 minutes more.  Know what?  It’s ready.  Just like that.

Cheryl’s Tips:

I don’t have extra tips for this recipe, because it’s that simple and elegant.  I’ll use this space to tell you you’re doing an amazing job as a person.  If you’re reading this recipe, you at least have an interest in cooking, which is creative, which means you’re reaching for something beyond the ordinary, which makes me like you.

Here’s To Sanity and 85% Dark Chocolate,

Cheryl

Cheryl Sipkowski, MS, LPC

Blistered Shishito Peppers with Garlic Aioli :: Friday Foodie

May 9, 2014 By: babyproofedparentscomment

peppers

Before we begin, try saying their perfect name out loud: shi-SHEE-toes.  Isn’t that lovely?  A farmer at my favorite market recommended these perfect peppers, and I’ve been hooked ever since.  I’ve noticed several posh restaurants have added shishitos to their appetizer menus with a steep price tag.  Preparing them yourself is cheaper and way impressive as an appetizer or a side veggie (divide the aioli into tiny dipping bowls and serve a few peppers on each plate).  Risk Disclaimer:  most shishitos are mild with a tiny hint of sweet, but occasionally you’ll come across one that packs a little heat.  If your child is sensitive to spicy foods, sample each pepper before serving it to them, unless they’re like my pepper-belly son.  Given food with heat, he’ll accusatorially say, “Mom! Spicy!” while continuing to shovel in huge mouthfuls.  We have to monitor our margarita intake at Mexican restaurants so we can keep a close eye on him; once he slipped a drinking straw into the salsa bowl and guzzled it.  I think it’s genetic, as I am spicy food girl and have blown out my taste buds’ heat detection abilities.  If the menu has a million asterisks denoting the spiciness of a dish,  “Warning!  You probably shouldn’t order this!” then that’s what I’ll be having.  But don’t fear the shishito, and get ready to fall in love with the aioli.

Ingredients:

For the Aioli:

  • 1/2 cup mayonnaise
  • 1 clove garlic, finely minced
  • 1/2 teaspoon fresh lemon juice
  • 1/4 teaspoon Spike seasoning (optional, but delicious flavor without a bunch of gunk you can’t pronounce)
  • (If you don’t use Spike, add 1/8 teaspoon each of kosher salt and cayenne pepper)
  • 1/2 teaspoon Dijon mustard

For the Peppers:

  • 4 cups shishito peppers, washed with stems left on
  • 2 tablespoons macadamia nut, peanut or grape seed oil
  • 1 teaspoon coarse kosher salt

Technique:

For the Aioli:
Combine all the ingredients with a small whisk, and place in a small bowl for dipping.  I love it when things are this easy.

For the Peppers:
Heat a large skillet over medium-high, then add the oil.  When it’s shimmering, carefully add the shishitos, which will go crazy at first, making the hot oil pop.  Once they calm down, begin to stir-fry them with a wooden spoon, until you can see the skin start to whiten and then lightly brown in spots, about 7-10 minutes.  Add a tablespoon of water and turn the heat down to medium (this will steam and soften them to the perfect texture).  Continue stir-frying until the water completely evaporates, and the shishitos are slightly more pliable (about 3-5 minutes more).  Add the salt, stir a few more times to coat the peppers, then serve them on a platter next to your cute little bowl of aioli.  Allow to cool for a few minutes and then dive in, dipping each pepper and challenging yourself to eat them all the way to the stem in one perfect bite.

Cheryl’s Tips:

I recommend using a garlic press.  They’re quick, easy to clean, and make the flavor of the garlic even more potent.  When you’re using raw garlic in a dip or salsa, cut the cloves in half lengh-wise, and check for any little green shoots in the center (which can make your dishes taste bitter) before chopping or putting them through your press.  Use a small knife to dig out the shoots and compost them, or plant them to grow more!  I always use fresh garlic instead of the pre-minced jarred kind – I can’t imagine mass-producers carefully removing little green shoots.

The aioli.  Yum.  If you haven’t already eaten the leftovers with a spoon, it will keep refrigerated for up to two weeks.  It’s divine on sandwiches, eggs, roasted chicken, as a dip for raw veggies, or my favorite use:  atop pan-seared salmon.  I often double the recipe, keeping it on hand as a condiment.

Shishito it up, ya’ll.

Here’s to Sanity and Pepper-Bellies,

Cheryl

5_MG_0872

Paleo Chocolate Chip Banana Bread :: Friday Foodie

April 25, 2014 By: babyproofedparentscomment

bananabread

This decadent, healthy bread hails from George Bryant, dynamic author of the website, Civilized Caveman Cooking.  Even if you’re not into eating a paleo diet, you’ve got to check out his site, where you’ll enjoy gorgeous photos and delicious, easy to execute recipes.  Plus, “Civilized Caveman.”  I need a minute.  Okaaaayyyy on with the recipe.  I’ve barely modified it by adding zucchini and chocolate chips, for the extra nutrients and yumminess.  Another delightful version omits the chocolate chips and adds chopped pecans, chopped pineapple and toasted coconut.  I love that a thick slice of this bread not only tastes amazing, but has everything you need for a complete meal:  veggie-based carbs, fat and protein.  It also freezes well, should you ever find yourself in an alternative universe with leftovers.

Ingredients:

  • 4 very ripe bananas, mashed
  • 1/2 cup finely grated zucchini
  • 1/2 cup almond butter
  • 4 tablespoons coconut oil, melted
  • 4 eggs
  • 1 teaspoon pure vanilla extract
  • 1/2 cup coconut flour
  • 1/4 teaspoon kosher salt
  • 1 teaspoon baking powder
  • 1 teaspoon baking soda
  • 1/2 cup Goodlife chocolate chunks or mini-chips (heavenly chocolate, without a bunch of crappy things you can’t pronounce)
  • Butter for greasing your loaf pan and spreading on the warm bread… mmmmm


Technique:

Preheat your oven to 350 degrees.  Using about 2 teaspoons of unsalted butter, grease a glass loaf pan (yes, glass, because metal pans get a little extra hot, making the crust too dark and the middle too doughy) very, very well, otherwise the bread will stick like glue, and you don’t want to miss a single bite.  (Mandy and her girls refer to pan stickage as “shrapnel.”  See my tips below to avoid this terribly unfortunate loss.)

In a medium bowl, use a hand mixer to blend the bananas, zucchini, almond butter, coconut oil, eggs and vanilla until smooth and creamy.  Add all of the remaining ingredients and mix until smooth and creamy again.  You needn’t worry about mixing speed or time once the batter is blended, as this is one of those rare baking adventures that doesn’t require precision; the bread won’t collapse on you or wind up full of holes. Scrape the batter into your loaf pan, and bake for 50 minutes.

Place a strip of foil loosely over the top of the loaf to avoid excessive browning, and bake 10-15 minutes more, until the bread looks evenly browned and doesn’t quiver when you tap the pan.  Allow it to cool in the pan on a rack for about 45 minutes before serving with more butter.  Dang!

Cheryl’s Tips:

I’ve tried a version with not-so-ripe bananas, which according to George makes little difference.  Perhaps I have a high-maintenance pallet, but it didn’t taste as sweet as the version with super ripe.  I’ve started buying way more bananas than we need, and when we get to the final four, tossing them in the fridge, where they’ll last at least a week.  They turn very brown, but when you peel them, they’re perfect and have a higher sugar content. (Preview:  start saving cut up extra-ripe bananas in your freezer for smoothies, a recipe that will blow your baby-lovin’ mind is coming soon.)

I am easily pleased by the obscure.  Examples:  the first squeeze (from the very middle) of a new tube of toothpaste, perfectly peeling a label off a new purchase without the tiniest spec of sticky left behind, and dislodging a loaf of bread leaving a crumb-free pan.  Somehow, these minor victories slightly balance chaos.  After the bread cools, run a knife carefully around the edges of the loaf several times.  Invert the pan onto a bread board and tap the bottom, allowing the loaf to slowly and elegantly fall out.  Enjoy this moment of perfection.

Here’s To Sanity and Cavemen,

Cheryl

5_MG_0872


Gluten-Free Lemon Pancakes w/ Honey Butter :: Friday Foodie

April 10, 2014 By: babyproofedparentscomment

lemonjacks

Show me a therapist with a happy, idyllic childhood, and I’ll show you a unicorn.  Growing up had some pretty rough spots for me, but a bright one was the annual Kiwanis Pancake Supper (isn’t the word “supper” awesome?).  All you could eat stacks of round perfection, with slabs of fried ham on the side.  Balanced nutrition, and a big room full of, at least momentarily, jolly people. So it is with fondness that I present the first of many pancake recipes to come.  Now that I think about it… my 40th birthday is approaching. There will be many, many events commemorating this milestone, and you are witness to the birth of my first solid plan:  Cheryl’s 40th Birthday Pancake Supper.  It is ON.  Okay I’m back.  These light, fluffy, lemony pancakes will delight you.  Go get some lemons and make them right now.

Ingredients

For the Honey Butter:

  • 2 tablespoons softened sweet cream butter
  • 1/4 cup honey

For the Pancakes:

  • 2 cups Pamela’s Baking & Pancake Mix
  • 4 tablespoons coconut oil, melted (more for cooking the pancakes)
  • 2 eggs
  • 2 teaspoons vanilla extract
  • 1/2 cup kefir or plain yogurt
  • 1 1/2 cups milk or milk alternative (my favorite is almond milk)
  • zest and juice of two lemons

Technique

For the Honey Butter:
Using a fork or small whisk, mix the honey and butter together until you reach a thick, spreadable consistency.  It will be lumpy at first, but keep working with it until the butter melts into the honey evenly.  If needed, pop the mixture into the fridge for a few minutes to thicken it further before serving it on the pancakes.

For the Pancakes:
Whisk all ingredients together (quickly after putting them in your mixing bowl, as the coconut oil can solidify and make the batter lumpy).  Heat a griddle or skillet over medium heat.  Add a tablespoon of coconut oil, and when it melts and is shimmering, dispense about 1/4 cup of batter per pancake (less for small kid-sized pancakes).  Allow the first side to cook until there are bubbles coming up in the center of the pancakes, and it’s easy to slide a spatula under them without a bunch of batter running off the middle (about 2 minutes).  Flip the pancakes, and allow the second side to cook for about 2 minutes.  When both sides are golden, serve them up with fresh berries and a dollop of honey butter.  This recipe feeds two adults (4 pancakes each) and 2 kids (6 silver dollar sized pancakes each).

Cheryl’s Tips

If you’ve made the Lemon Ginger Scones, I hope you treated yourself to a citrus zester.  Pull that bad boy out for these pancakes.
I also love my batter dispenser.  It makes perfectly round pancakes, and really cuts down on mess.  We eat pancakes at least once a week, so this seemingly frivolous tool has been very useful.  If you don’t use all the batter, you can cover the dispenser with foil, and use it again in the next few days.  Just add a splash of milk, whisk the batter a little and throw down another batch.
Pamela’s Baking & Pancake Mix is a staple in my pantry.  It’s expensive, but if you if eat gluten-free, it’s worth it.  This magical product keeps our table stocked with waffles, endless varieties of muffins, pizza, biscuits and cinnamon rolls, all without the bloat and constipation.  Now that’s yummy.

Here’s To Sanity and Supper,

Cheryl

5_MG_0872

Gluten-Free Parsley-Garlic Chicken :: Friday Foodie

March 27, 2014 By: babyproofedparentscomment


parsley_chicken

This is a gluten-free version of a classic recipe Jacques Pépin prepared on one of his PBS shows.  Jacques is awesome.  My favorite series is “Cooking With Claudine” (his daughter); for the food, but even more for their fascinating relationship dynamic, which includes Claudine’s habit of snapping at Jacques each time he gently suggests she alter her cooking technique.  I LOVE being a therapist.  This dish is easy to prepare, has very few ingredients, and is a great kid alternative to chicken nuggets – I’ve served it to a few picky eaters who inhaled it despite the green.

Ingredients:

  • 4 boneless, skinless chicken breasts
  • 1/2 cup brown rice flour
  • 1/2 cup loosely packed Italian parsley leaves
  • 2 cloves fresh garlic
  • 1 teaspoon kosher salt
  • 2 tablespoons grape seed oil
  • 1 tablespoon unsalted butter, cut into small pieces

Technique:

Cut the chicken into 1 by 1 inch pieces (for extra info on preparing boneless breasts, see my tips below).  Place the chicken in a Ziplock bag with the brown rice flour, seal and shake (the bag, and your body too if you’re into it) until all the pieces are coated.  Chop and chop and chop the garlic and the parsley, mixing them together on the same cutting board, scooping them into a pile with your knife and then chopping them again until you get this consistency:

choppychop
You can see it’s not as finely chopped as pesto, but there aren’t big chunks either.  Heat the grape seed oil in a large skillet over medium-high until it’s shimmering, then carefully place the chicken pieces in a single layer (you might have to do this step in two batches, placing the first cooked batch on a plate while the second is browning). Let the chicken cook until it’s lightly browned on the first side, and you can see that some white is creeping up over the pink edges (about 2-3 minutes).  Flip the pieces with tongs and brown the other side, about 2-3 minutes more.  If you did batches, add the plated chicken back to the skillet, and then add your beautiful parsley-garlic choppy-chop.  Using a wooden spoon, stir-fry the chicken until it’s coated with the parsley and garlic, and you can smell the garlic releasing that yummy smell (usually about 2-3 minutes – keep an eye on the garlic and try to keep it from browning).  Add the butter pieces and the salt, and continue stirring until the butter has melted over the chicken, and the whole pan looks like sizzling, golden decadence (about 1-2 minutes).  Dish it up and dig in!

Cheryl’s Tips:

Boneless, skinless chicken comes in many sizes.  I try to buy organic when I can, which usually means a smaller breast.  If you’re using the bigger size, you’ll notice one end is much thicker than the other.  A trick: place the breast in a sealed Ziplock bag and use the smooth side of a meat tenderizer mallet to pound it out until the breast is at a uniform thickness, which will make it easier to cut into consistently sized pieces, or, if you want to keep the breast whole, it will cook evenly and to perfection. How efficient to simultaneously prep food and process anger?  I didn’t have a mallet for many years, simply washing and using the flat side of a hammer.  MacGruber.

I gave measurements for 2 adult and 2-3 kid-sized portions. The one downside to this dish: the left-overs are lackluster, so prepare just enough to feed your family for one meal.

Here’s to Sanity, Jacques and MacGruber,

Cheryl

5_MG_0872


PS: For those of you who are Bloglovin’ followers, you can now find our blog on their gorgeous roster. And we’re lovin’ it. : )

Follow on Bloglovin

Braised Collard Greens with Olive Oil Breadcrumbs :: Friday Foodie

March 13, 2014 By: babyproofedparentscomment

braisedcollards

Okay.  I’ll be straight with you… my kids become mildly offended when I serve greens to them, rendering this recipe slightly less than family “friendly”.  But, as you’re gathering, BPP is all about self-care, which carries over to how your kids see you taking care of your own body, and the resulting impression on them. There are lots of suggestions out there on getting veggies into your child’s diet. My two approaches are to purée and hide them (more on that in the Cheryl’s Tips section below), or to give them a healthy serving, and when they protest, announce, “Mister Collard just wants to sit on your plate.” (Aside: why do I always refer to veggies in the masculine? I’ll have to analyze that.) Bottom line, these buttery-textured greens are delicious and incredibly good for you.

Ingredients:

For the Breadcrumbs:

  • 2 slices thick bread (gluten-free if you’re into it), coarsely crumbled
  • 2 tablespoons olive oil
  • 1/4 teaspoon kosher salt
  • 1/8 teaspoon freshly ground pepper

For the Greens:

  • 4 bunches collard greens, washed and sliced across the width in 1 inch strips, discarding the thick bottom stems (this will seem like a ton when you’re buying them, but trust me, they reduce dramatically when they cook, and you will want left-overs!)
  • 1 cup chicken or veggie stock
  • 2 heaping tablespoons coconut oil
  • 1 tablespoon kosher salt (I like my food highly seasoned, use less salt if you are sensitive to it)

Technique:

The Breadcrumbs:  Preheat your oven to 350 degrees.  In a small bowl, stir the breadcrumbs with the olive oil, salt and pepper, and spread on a small baking sheet.  Toast in the oven for about 10 minutes or until golden brown and crunchy.

The Greens:  Place the greens in a in a large dutch oven (you might have to stuff them down).  Pour in the stock and add the salt and coconut oil (don’t worry if it’s still in a solid form – it will melt fast).  Don’t bother stirring yet – too much going on in that pot.  Cover with a heavy lid, and place over medium high heat.  Check every couple of minutes until the liquid starts to boil. Using tongs, carefully stir the greens together until they are all coated with the liquid and have started to reduce in mass.  Replace the lid, and allow the greens to cook at a boil for about 5 minutes.  Reduce the heat to low, and let them simmer an additional 10 minutes (less time if you like your veggies on the firmer side, more time if you like softer.  I used the cooking time for my preference, slightly firm in texture, but a little soft without being squishy or slimy).  The greens will have gone from a bright shamrock to a slightly darker camo green.  Turn off the heat and remove the lid to stop the steaming.  Top each serving with a couple of tablespoons of breadcrumbs and enjoy!

Cheryl’s Tips:

This technique works well with a variety of greens: kale, mustard, Swiss chard, etc.  Simply adjust the cooking time to make sure the resulting texture is to your liking. Collards are my favorite, because they aren’t bitter, and their rich texture is heavenly.  Make the greens a complete meal by topping a bowl of them with tofu, a fried egg, or a few Mandy’s Meatballs.

I love my mini chopper. It’s the perfect, easy-to-clean size for puréeing small servings of veggies to stir into an already kid-approved pasta sauce or meatball recipe.  I usually mix about 1/2 cup of the puréed greens into 2 cups of pasta sauce, then toss with 4 cups of cooked pasta.  If you have extra purée, you can freeze it in ice cube trays for future use.  If you’re interested in making your own baby food, check out Super Baby Food – full of easy recipes for your little ones, plus a handy chart outlining what foods are safe to try at what ages.

Here’s to Greens and Sanity,

Cheryl

5_MG_0872

Gluten-Free Lemon Ginger Scones :: Friday Foodie

February 20, 2014 By: babyproofedparentscomment

LemonScones

These sweet-tart-delightful scones are a mash-up between two of my favorite recipes: Elana Amsterdam’s basic scones (see her amazing gluten-free/paleo website:  http://www.elanaspantry.com), and my sweet friend Sara’s decadent lemon ginger scones.  They are perfectly enjoyed for breakfast or a mid-day snack, and the almond flour adds some healthy protein to the mix.

Ingredients:

The Scones:

  • 2 cups almond flour (sometimes called almond meal)
  • 3/4 teaspoon baking soda
  • 1/2 teaspoon ground ginger powder
  • 1 tablespoon minced fresh ginger
  • 1/4 cup chopped crystalized or candied ginger
  • zest of 2 lemons
  • 1 egg
  • 3 tablespoons agave nectar

The Glaze (optional, but mmmm):

  • 1/2 cup fresh lemon juice
  • 1 cup confectioners sugar

Technique:

The Scones:  Preheat your oven to 350 degrees.  Combine all ingredients except for the the egg and agave nectar in a medium mixing bowl.  In a separate small bowl, whisk the egg and agave nectar together, then mix into the dough, which will be chunky/lumpy and feel like sticky, heavy, gritty play-dough (I know, doesn’t  sound awesome yet).  No need to kneed, just mess with it with your hands or a non-stick spoon until it looks pretty consistent.  On a cookie sheet lined with parchment paper, use your hands to form the dough into a flat circle, about an inch thick.  Use a pizza cutter to slice the dough into 6-8 triangles, and gently move the triangles apart so they’re not touching.  Bake for 10 minutes, until the scones are light brown around the edges.  While they’re baking…

The Glaze: Whisk the lemon juice and confectioners sugar to form a glaze.  If you like thin glaze, you can add more juice, and more sugar will thicken it up like icing.  I used the measurements for my personal favorite consistency, which melts over the warm scones but doesn’t drip everywhere.

Let the baked scones cool for about 5 minutes, put them on a plate and drizzle the glaze over them.  Eat them right now!

Cheryl’s Tips:

Scones are fun to make, because they are very difficult to mess up (a major plus in my book, as baking is not my forte).  Don’t worry if they’re not pretty, because if they’re warm, they’ll be delicious.  Give me taste over aesthetic any day.

These are not only gluten-free, but paleo “friendly” – friendlier if you omit the ginger candy and glaze.  Stay tuned for more about the health advantages of eating gluten-free/paleo foods.  Almond flour is essentially very finely ground almonds – the stage immediately preceding almond butter. You can find it and all of the other ingredients for the scones at your local Whole Foods.

I love my citrus grater. Hold the grater firmly in your non-dominant hand, and your lemon/lime/orange in the other, then lightly rub all sides of the fruit against the grater over a bowl.  It does all the work for you, perfectly zesting the flavorful part of the rind and leaving the white part behind.  Be careful and don’t use too much pressure, as you don’t want to slip and get bodily zest in your food.

Here’s to strength, sanity and family-proofed meals.

Cheryl

5_MG_0872


Mandy’s Meatballs :: Friday Foodie

February 6, 2014 By: babyproofedparentscomment

mandy meatballs

These delicious meatballs are adapted from a recipe that came from one of the coolest mamas we know (you’ll be hearing more from her down the road).  My favorite thing about this dish is that every savory bite is a perfectly nutritionally balanced… and as you’re gathering, we’re all about the balance.  Also, they freeze really well, so double up and save half for a night when you’d rather play than mess up the kitchen.

Ingredients:

  • 1 pound ground grass-fed beef or bison
  • 1/2 pound pork, chicken or turkey Italian sausage (spicy or sweet)
  • 1 cup steamed white or brown rice
  • 1/2 c finely chopped onion
  • 1/2 c finely grated zucchini
  • 1 teaspoon salt
  • 1/2 teaspoon black pepper
  • 1 teaspoon Spike Seasoning (optional)
  • 1 16 ounce can tomato sauce

Instructions:

Preheat oven to 350 degrees.  Mix all ingredients except for the tomato sauce.  Form into 1 inch balls, and place in a lightly greased casserole dish.  Drizzle the tomato sauce over the meatballs, and bake uncovered for 1 hour.  Stand in your kitchen, and breathe deep – they smell amazing and taste even bettah.

Cheryl’s Tips:

What’s Spike Seasoning?  The bomb.  A yummy, natural seasoning alternative to typical blends that use msg and other junk that’s hard to pronounce.  Look for it at your local health food store, or at http://spike-it-up.com/

Another kitchen tip:  Keep a box of surgical gloves handy (tee hee) for forming meatballs, deboning chicken, etc.  Keeps gunk out from under your gorgeous fingernails and makes clean-up easy.

Here’s to strength, sanity and really yummy meals.

Cheryl

5_MG_0872

  • « Previous Page
  • 1
  • 2

Connect with BPP

Search The BPP Blog

Online resource for new and expectant parents

Welcome to BPP, an online resource for maintaining your sanity – before, during and after your baby's arrival. I'm Kirsten Brunner and I'm here to support YOU. Read more...

Parenting tips and advice
I'm Published by Mamalode!
TODAY.com Parenting Team Parenting Contributor

Tags

anger anxiety baby birth partner breakfast childbirth co-parenting communication conflict coparenting couple's communication crying dad depression dinner divorce doula easy recipe foodie friends gluten-free healthy hospital kid-friendly labor & delivery laughter love marital marriage newborn parenting postpartum pregnancy prenatal relationship sanity self care sides single parent strength stress stress mgt tantrums tip veggies

Learn About Our Professional Counseling Services

Learn About Our Professional Counseling Services

Pre-Order My Book

Pre-Order My Book

Our Partners

Our Partners

Recognition

Recognition
The Land of Nod, design for kids and people that used to be kids
Tiny Prints - Holiday Offer

For Parents of Multiples

How Do You Do It?

Monthly Archive

The Land of Nod, design for kids and people that used to be kids

Copyright © 2025 · Modern Blogger Pro Theme By, Pretty Darn Cute Design